About WebQuests
About WebQuests
Overview
In this section, you will learn about the concept of WebQuest.
Definition of webquest
Professor Bernie Dodge of San Diego State University defines a WebQuest as an inquiry-oriented activity that uses resources on the World Wide Web. WebQuests pull together the most effective instructional practices into one integrated student activity. These Web-based projects use World Wide Web sites to help students develop problem-solving and decision-making skills. WebQuests are interesting and motivating to teachers and students. An effective WebQuest develops critical thinking skills and often includes a cooperative learning component. Students learn as they search for information using the Web, following a prescribed format that focuses on problem solving and authentic assessment. A well-written WebQuest requires students to go beyond simple fact finding. It asks them to analyze a variety of resources and use their creativity and critical-thinking skills to solve a problem. WebQuests help students analyze, synthesize, and evaluate information. There are two kinds of WebQuests, short term and long term.
The attributes of a short term WebQuest are:
- knowledge acquisition and integration
- making sense of large amounts of information
- typically completed in one to three class periods.
- extending and refining knowledge
- analyzing a body of knowledge thoroughly and transforming it
- creating a product that others can respond to
- typically completed in one week to a month. Elements of a WebQuest WebQuests are different from “scavenger hunts,” a much simpler approach that is as old as the Web itself. In a typical scavenger hunt, students are given a list of items they must find (answers to questions, for example, or instances of data) and are set loose on the Web. WebQuests are much more structured and focus heavily on collaboration.
Components of a webquest
Every WebQuest has six basic components:
- Introduction. This is an overview (often a simple one) of what is to come. Many WebQuests take place within a story setting; in these instances, the Introduction is where the plot and characters are introduced.
- Task. This page details the assignment that is to come. Tasks are often comprised of numbered lists of items that must be accomplished to complete the quest.
- Process. The Process is the meat of the quest — it is here that students work together, develop plans of action, and find ways to solve the presented problem. Often, quest processes may involve role-playing and other off-line methods.
- Evaluation. The evaluation phase centers on a “rubric,” a carefully designed chart listing goals for the quest and the standards by which performance will be measured. This can be thought of as a great widening of the typical letter grade usually given to classroom assignments. Rubrics are highly annotated “grades” with extensive annotation detailing many aspects of the project.
- Conclusion. This is a brief summary, usually congratulatory in tone, that wraps up the project.
- Teacher Page. Instructors are provided with their own subsection of the WebQuest site, with instructions for each of the above sections. Teachers who develop WebQuests often fill this section with information to help other educators adapt the quest to their own class.
The non-web webquest?
It might sound odd, but educators without in-classroom computers or Web access can still use the principles behind WebQuests. In fact, the first WebQuest used simply paper and pencil. Several years ago, WebQuest inventor Dodge was working on a lesson for second-semester student teachers concerning an educational software package. But Dodge didn’t have access to the software, so instead he accumulated as much information as he could about the product: evaluations, printouts of Web sites devoted to the topic, and even a transcript of a Web chat with one of the developers. He organized this material into thematic sections, and then handed them over to the students. Their job was to internalize the information, then collaboratively develop a working plan for determining whether or not the software was viable for the school where they were teaching.
Dodge told Education World magazine that he knew from the beginning that he had stumbled onto something special: “It was great! Having done my part ahead of time by organizing the resources, I had to speak very little during the two hours they worked on it. I enjoyed walking around and helping where necessary and listening to the buzz of conversations as students pooled their notes and tried to come to a decision. The things they were talking about were much deeper and more multifaceted than I had ever heard from them. That evening I realized that this was a different way to teach —and that I loved it!” Ultimately, the WebQuest idea is about more than simply using the Web for research. It is a structured process for introducing problems, building methodical approaches to solving those problems, and then getting students to tackle them.
The benefits of webquests
Using WebQuests in our classrooms can help build a solid foundation that prepares them for the future. The First WebQuests In 1995, San Diego State University’s Bernie Dodge and Tom March developed a type of lesson plan—what they termed a “WebQuest”—that incorporated links to, from, and along the World Wide Web. Students were presented a scenario and a task, usually a problem to solve or a project to complete. The students were given Internet resources and asked to analyze and synthesize the information and come up with their own creative solutions. Over the next three years, teachers wrote their own WebQuests, and instructors began to teach WebQuests in their workshops and classes. Fortunately, this proliferation of curricular materials convinced many teachers that it was all right to publish their own WebQuests for others. Most teachers have included their e-mail addresses, which allow a WebQuest user to contact the teacher and discuss quest results. Additionally, WebQuest sites have sprung up and continue to grow on the Internet.
Why bother?
Why should you take the time to create a WebQuest? The best reason is that, like any carefully planned lesson, a good WebQuest makes learning interesting for your students. Beyond that, however, several other factors make WebQuests a powerful learning tool. First, a good WebQuest puts the power of the web behind your topic. You can show students - or let them discover for themselves, not just tell them. Web sites can take your students anywhere in the world. WebQuests are a way to let students work at their own pace, either individually or in teams. A WebQuest lets students explore selected areas in more depth, but within limits that you have selected. This makes WebQuests ideal for classes which combine students with different ability levels. WebQuests offer a different, more dynamic approach to teaching the value of research. WebQuests can also increase the "comfort level" of students using the Internet for learning activities. While your students are probably already computer literate, a properly designed WebQuest can help students become creative researchers rather than simply "surfing" from one site to another.
How can I use webquests in conjunction with other educational techniques?
WebQuests are based on the ideas of inquiry and constructivism. WebQuests also incorporate cooperative and collaborative learning, since students work on projects in groups. These concepts can play a role in teaching with WebQuests. WebQuests can also help students meet standards focused on critical-thinking and analysis skills, and may be particularly useful for social studies and science. By using multimedia, WebQuests also help with multiple intelligence work. Alternative kinds of assessment can be used to judge the results of WebQuest projects. And, obviously, WebQuests are one way to use the Internet in education. WebQuests are tools, not educational theories, so they can be used in virtually any classroom with appropriate computer access.
Overview
It is very important that you view some of the WebQuest examples before creating one yourself.
Step 1: Choosing an example
Fortunately, we have a database of thousands of webquest for you that are seperated by grade level or/and subject matter. If you want, you can even search entire database for a certain keyword.
You can visit our WebQuest Matrix to browse the WebQuest database at anytime.
Step 2: Evaluating webquests
Now that you're familiar with the elements of a WebQuest, it's time to begin judging the quality of a WebQuest. Just because a WebQuest contains the essential elements doesn't mean that it's perfect. You need to look beyond the structure and examine the effectiveness, efficiency, and appeal of the project. Ask yourself:
- Is it a quality project?
- Does it fit my needs?
- Is it a good use of time?
- Is it a good use of technology?
Use the integrated WebQuest Rubric listed at ZUNAL.COM
Overview
Now that you feel comfortable with the concept of WebQuests, it is time to create your own. With a FREE account, you can start creating your WebQuest at anytime.
Step 1 - Choose a topic, title, subject & grade
First, you need to decide on your Topic, Subject and the Grade Level of your WebQuest. Once you determine these three items, the rest will be easier.You will need to answer the following questions:
- How do you choose an effective topic for a WebQuest?
Start with your standards. Ask yourself the following questions to help you identify a topic. What do you (or plan to) teach? Remember, not all topics are appropriate for WebQuests. Since WebQuest development is time-consuming, it's a good idea to carefully identify a topic and matching standards that will benefit from an inquiry-based, technology-rich project. - Once the topic selected, decide on the subject and the grade level. Your options are
- Subject: Art Music, Business/Economics, English/Language, Foreign Language, Health/PE, Life Skills/Careers, Mathematics, Professional Skills, Science, Social Studies, Technology
- Grade Level: K-2, 3-5, 6-8, 9-12, College / Adult
- Some Questions to ask
- What do I want my students to learn as a result of this lesson?
- Why is this information important?
- Where does the information fit into the specific context of this unit?
- How does this information fit into the broader curriculum?
- How can this information help students make connections across subject areas?
Step 2: Decide to adapt a webquest or create from scratch
Creating a WebQuest from scratch might seem like a daunting task, no matter how enthusiastic you are about the format. It takes a certain level of technical skill, familiarity with the subject matter, and time to round up appropriate links. Fortunately there are thousands of WebQuests in existence out on the web. You can adapt one of the WebQuests available or you can create from scratch.
Step 3: Plan components of your webQuest
Here are the basic components of a WebQuest.
- Introduction
Provide an engaging first statement that sets the stage for the entire Webquest. Use your creativity to immediately “hook” students. Include the essential or guiding question around which the WebQuest revolves and provide necessary background information. (Note: the essential question and background information may also be listed as separate elements of your quest, or they may be included as part of the Task.) - Task
Describe the end result of the work students will do. It may be a performance, a multimedia presentation, or some other type of product. You may have everyone complete the same task, such as creating a PowerPoint presentation, or you may offer your students a variety of tasks from which to choose. - Process
Clearly describe the step-by-step process students will go through to accomplish the task and define any roles they will be playing. You may also want to give students advice and guidance about how to approach each of the individual steps of the process. Taking the time to carefully explain the process up front will head off many potential problems and help to avoid frustration and confusion.
Information Sources: Identify the online and offline resources students may use. It’s common to embed links to Internet resources in the WebQuest itself. However, you may choose to provide a list of resources in a separate document. All students may not use all of the resources, especially if students play different roles. - Evaluation
Measure student results periodically during the WebQuest as well as at the end. Ongoing feedback will help keep students motivated and on target with their research. There are many rubrics available online or you may create your own. - Conclusion
Make a final statement that brings closure to the WebQuest and gives students an opportunity to reflect on what they’ve learned. Many quests conclude by encouraging students to extend their learning. - Teacher Page
List objectives, standards, materials and credit etc.
Getting Started
Registration to ZUNAL
Creating an account at ZUNAL easy and fast. All you need to do is to fill out our registration form and submit. Registration process is instant, No waiting for account/email confirmation.
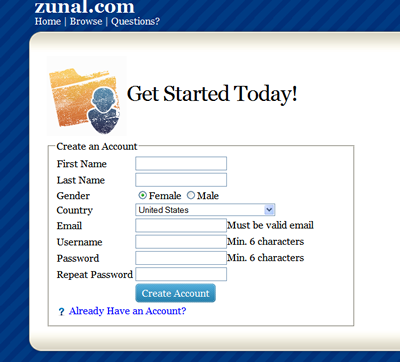
Figure 1. Registration Screen
Once registration process is completed, you will be asked to login with your username and password.
Login to ZUNAL
Please follow the login link located at the top-right corner of ZUNAL to login to your account.

Figure 2. Login Screen
Once you enter your username and password, you will automatically be taken to your account.
Lost Password
Happens to anybody. Just follow the link on the login screen (Forget your username /password". ZUNAL will automatically email you your username and password. There will not be a reset password process where you have to go back and forward. It is simple, you get your username and password back to your email address. If you have multiple accounts at ZUNAL, please make sure to type the email address you used for your correct account. If your email address is not located at ZUNAL, you will receive a warning.
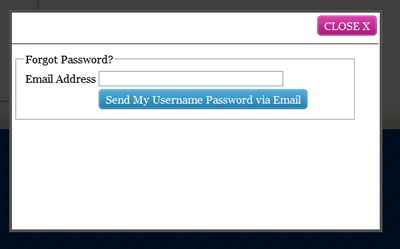
Figure 3. "Forgot Password" Screenshot
Please make sure to check your email including your spam folder. Sometimes email providers assume system automatic sent emails as spam.
automatically be taken to your account.
- Can I have multiple accounts?
Yes, however each account will require a new email address - Why should I input a valid email?
For account security. ZUNAL communicates with you by sending emails to your email address you input. ZUNAL sends welcome email including your username, password etc. If you use an invalid email, ZUNAL will email your account info to an unknown person who can login to your account and modify/delete your WebQuest(s). If the unknown person contacts us asking to remove the account (because this is not their account), we will remove immediately. - Do you share/sell our email address?
No, your email address is not shared or sold to anybody. - I keep receiving "Access Denied" messages even I have my current username and password entered into login screen, why?
We usually receive this error on firewall protected computer networks (schools, share computers etc.) In order for your computer to keep you logged in
Overview
Using "Account" page, you will always be able to change your profile information including changing your password. You will be able to view your account logs and account type.
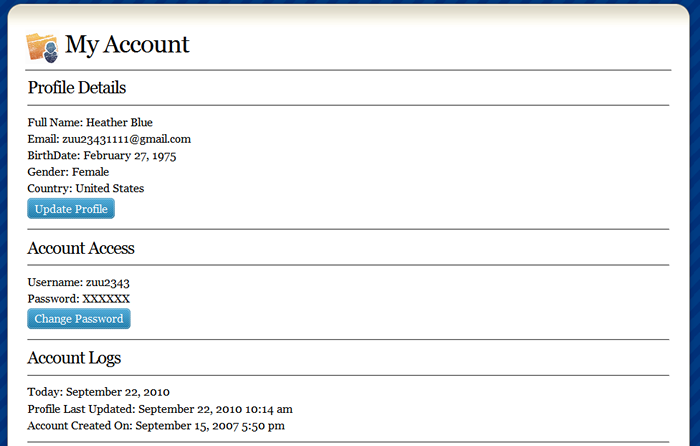
Figure 1. Screenshot of "My Account" page.
ZUNAL will ask you to provide information regarding your profile during registration. This profile information is not available to anybody else (or sold). It is completly for anonymous demographic statistics information for our research purposes (What is the precentage of males vs. females at ZUNAL, What is the average age of ZUNAL user etc.). It is important to have your email addess correctly at ZUNAL if you ever need to recover your password etc. You WILL NEVER receive an emails from ZUNAL that you did not request. We do not have newsletter subcriptions etc.
Update profile
In roder to change your profile information including your email, name, gender, please click on "Update Profile". A popup window will provide you the form for you to update your information. Click on "Save Now", your information will be updated automatically.
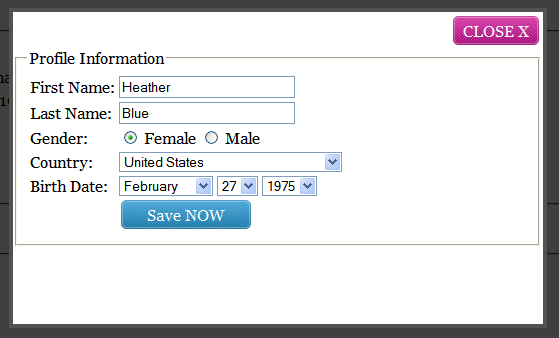
Figure 2. Screenshot of "Update Profile " page.
Change password
If you would like to change your password, go to your account page and click on "Change Password". A popup window will provide you the form for you to update your password. Click on "Save Now", your password will be changed automatically.
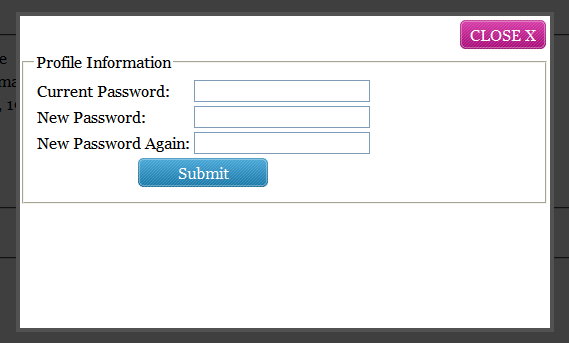
Figure 3. Screenshot of "Change Password" page.
- Can I change my username?
No
Using "My WebQuests" page functions
Once you login, you will be provided access to view/update/delete your own WebQuest(s). Of course, there will be other functions available to you, but this section covers only the mentioned features. Using the top right menu, click on "My WebQuests" link to access to the WebQuest(s) you created so far.
If you have any WebQuests of your own, they will be listed with the access info. (if not, page will basically tell you that you do not have any WebQuests under your account and prompt you to a link to create a new one. On "My WebQuests" page, a screen similar to below will be provided to you.
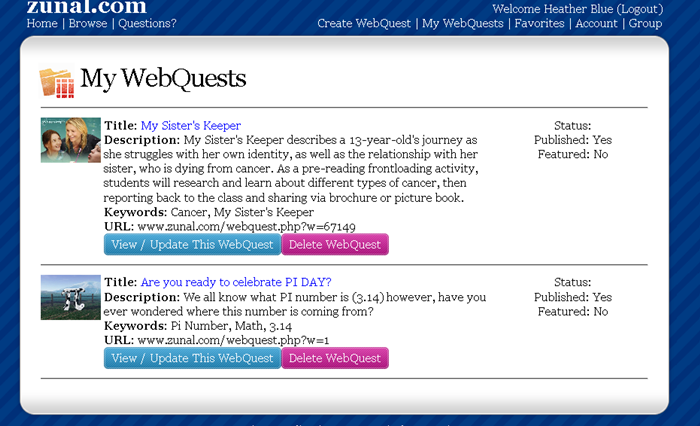
Figure 1. My WebQuests Screen
The page will provide detailed information for each of your WebQuests you created:
- Title of the WebQuest linked to your WebQuest,
- Description of your WebQuest, keywords for search engine,
- Direct URL to your WebQuest,
- Publish status (published: "Yes" means public can access to this WebQuest, "No" means only you can access to this WebQuest with a login, Featured: "yes" means your WebQuest is placed on ZUNAL homepage and available to search (if publish status is yes), "No" means public still can access to your WebQuest but via direct link - it is not placed on search engine.
- A button to "View / Update This WebQuests" This will take you directly to your WebQuest so that you can view or updated it
- A button to "Delete WebQuest". This will let you delete your WebQuest. (please see below for details).
Access/view your webquests
One of the simplest ways of accessing your own WebQuests is to use the buttons under each WebQuest listed on your "My WebQuests" page. Clicking the button will automatically take you to your WebQuest so that you can view / update it.

Figure 2. My WebQuest
Once you enter your username and password, you will automatically be taken to your account.
Update your webquests
Once you are at your WebQuest (you must be logged in), you will be able to update any portion of your WebQuest. Please remember that even published WebQuests can be updated and the changes will be active instantly (no need to re-publish). Extensive coverage of updating every single section of a WebQuest is provided next chapters (page by page, function by function). However, the idea is simple, go to the page you would like to update and change anything you want to.
Delete your webquest
You can delete your WebQuests (even after publishing them) at anytime. Of course you must be logged in and at the "My WebQuests" page. Under each WebQuest, you will see a button "Delete WebQuest". Using this button, you will be able to delete your WebQuests completely. Do not worry if you click on the button by mistake, the next page will prompt you on what you are about to do and ask you if you are sure to delete your WebQuest (see below).
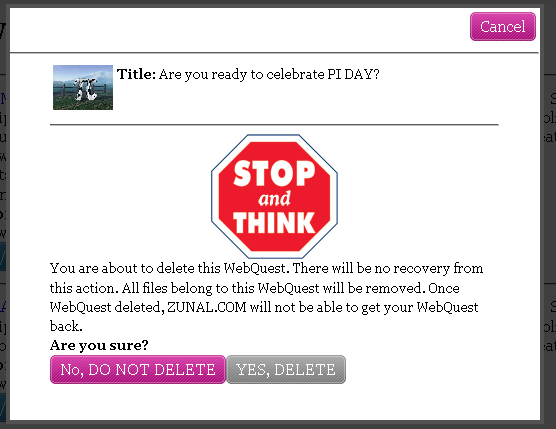
Figure 2. Delete WebQuest prompt screen
However, please understand that deleting a WebQuest will remove everything you have under the WebQuest including pages, files, quizzes etc and there will be no recovery from this action.
- Can I update my WebQuest even after I publish it?
Yes, you can update your WebQuests anytime. You do not need to re-publish it.
Using " Favorites" page functions
One of the most used features at ZUNAL is the "Favorites" page where you can have collect your favorite webquests located at ZUNAL. This feature is similar to my favorites folder on your computer however, it also gives you the ability to view your favorites at any computer anytime. (ZUNAL saves your favorite webquests on your account rather than your computer. Of the thousands of webquests available at ZUNAL, when you visit a webquest, you can easily bookmark it (you must login first) so that you can access them later. In order to access to your favorite webquest list, you need to login and click on "Favorites" menu item located on top-right section of ZUNAL website. (A prompt will appear if you do not have any webquest saved as "favorite".
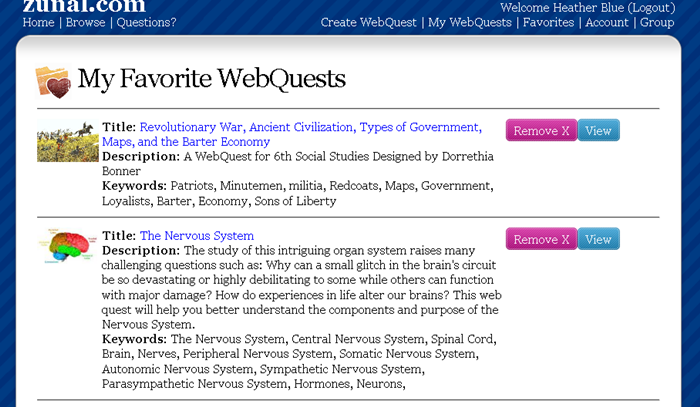
Figure 1. Favorites page screenshot
The page will provide detailed information for each of your favorite webquests:
- Title of the webquest
- Description of your webquest, keywords for search engine,
- Direct URL to webquest,
- A button to "View". This will take you directly to the webquest so that you can view it.
- A button to "Delete". This will let you delete this webquest from your favorites page. (please see below for details).
Add a webquest to your favorites
It is very simple. When you are browsing other webquests at ZUNAL, you will see a "Add to Favorites" button located on top-right section of webquest page. All you need to to is to hit on this button and confirm that you would like to save this webquest as one of your favorites.
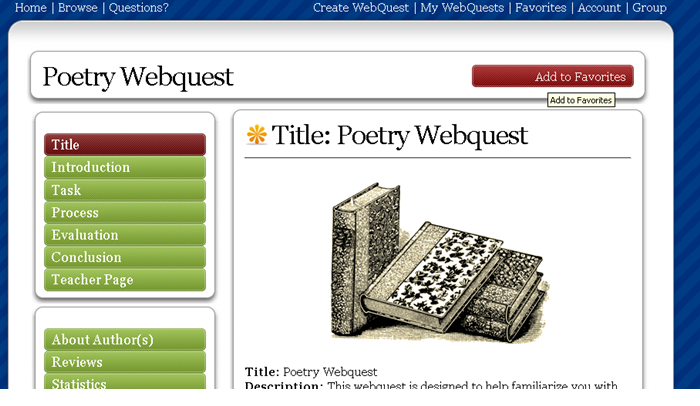
Figure 2. Adding a webquest to your favorites
Remember, you must be logged in.
Remove a webquest from your favorites
Once you are at your favorites page (you must be logged in), you will be able to view or delete your favorite webquests. You can delete each of saved webquests from your list anytime. Under each webquest listed on your "Favorites" page, you will see a delete button. Using this button will remove the webquest from your list.

Figure 3. Removing a webquest from favorites
- How many webquests can I save as favorite?
There is no limit on number of webquests you can save as your favorites
Using " Create WebQuest" page functions
In order to create a new webquest, you must be logged in and click on "Create WebQuest" link located on your control panel ( top-right section of ZUNAL). When it comes to creating a webquest, you have two options (depending your account type). Creating from scratch or Adapting/Copying an existing WebQuest. In this section we will cover "Creating a WebQuest from Scratch" (please see next section for Adapting/Copying Existing WebQuests).
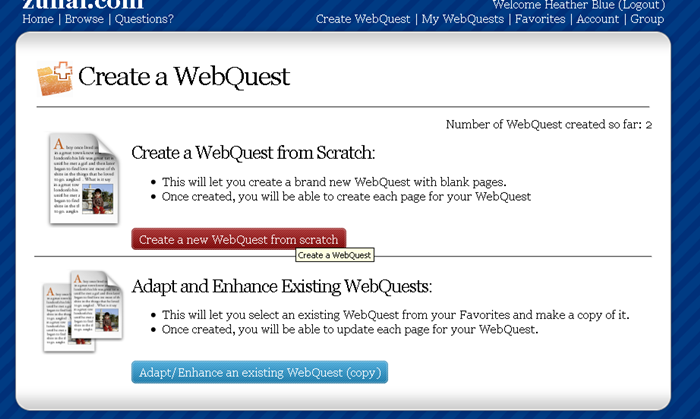
Figure 1. "Create a WebQuest" page screenshot
Create a webquest from scratch
It is very simple. Click on "Create a WebQuest from Scratch" button, a window will appear and only ask you if you have a title for your new webquest. You can enter the title (if you do not provide a title, it will be titled as "Untitled WebQuest". and press save now.

Figure 2. Creating a new webquest
ZUNAL will automatically do everything for you (1) create the structure of your new WebQuest that includes all standard pages (Title Page, Introduction, Tasks, etc) and (2) take you to your new webquest automatically so that you can edit each page according to your topic.
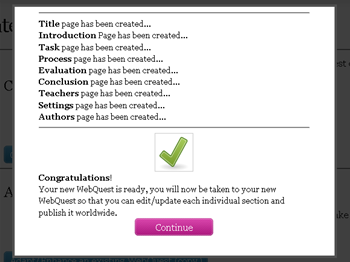
Figure 3. Saving your new webquest
Please remember, ZUNAL will create empty pages for you. You will be the one updating each section of your WebQuest by visiting and updating them individually.
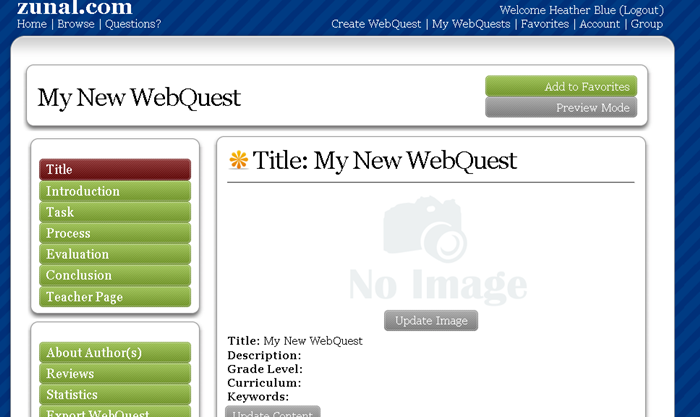
Figure 4. Your new webquest
- How many webquests can I save as favorite?
There is no limit on number of webquests you can save as your favorites
Overview
Creating a WebQuest from scratch might seem like a difficult task, no matter how enthusiastic you are about the format. It takes a certain level of technical skill, familiarity with the subject matter, and time to round up appropriate links. Fortunately there are thousands of WebQuests in existence out on ZUNAL. Most of those WebQuests were developed by humans in a hurry just like you. Because of their work, you no longer need to begin with a blank screen before you. Using ZUNAL, you are able to adapt/copy any of the published webquests (thousands available) at ZUNAL with one click. Below you will see instructions on how to complete this task.
Step 1: Finding the webquest you would like to adapt/copy
First thing you need to decide is which webquest you would like to adapt/copy. There are thousands available. Using the webquest matrix, you can view published webquest by topic, grade level or simply use search engine to search for keywords.
ZUNAL webquest matrix
Step 2: Marking the webquest you would like to adapt/copy as favorite
Once you found the webquest you would like to adapt/copy, you must save it as a favorite. This will ensure that you do not loose the original if you ever need it back. It is also necessary because you can only adapt/copy webquest from your favorite list. Therefore, once you find it, save it as favorite by clicking on the button "Add to Favorites" located on the original webquest.
Figure 1. Saving a webquest as "Favorite"
Step 3: Adapting/Copying the webquest
Now, it is time to adapt/copy the webquest as a new one. Go to "Create WebQuest and select "Adapt/Enhance an existing WebQuest (cop)" option.
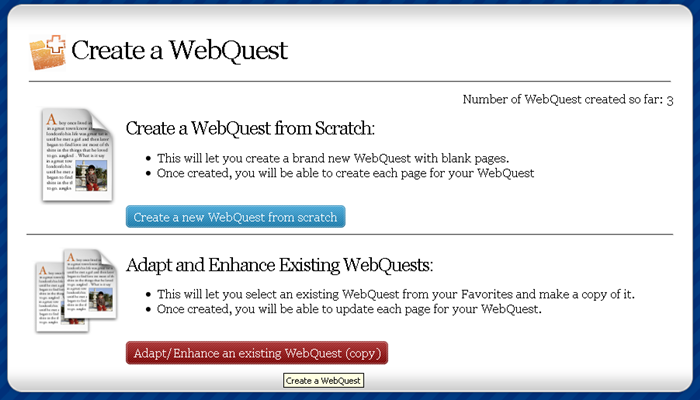
Figure 2. Adapt/Enhance an existing WebQuest (copy)
On the next screen it will ask you select the webquest you would like to adapt/copy with a title. The list basically is your favorite webquest list. Please remember, you can use the same title or enter a new one. Once selected, click on Adapt/Copy WebQuest.

Figure 3. Adapt/Copy WebQuest Screenshot
ZUNAL will then copy the entire webquest without any author information and have it ready for you to update/publish it publicly.

Figure 4. WebQuest Adapted/Copied Screenshot
Clicking on "Continue" button (see above) will take you to your new adapted/copied webquest. Please remember that your new webquest is still not public until you publish it. You can simply publish it directly without any changes or update certain sections first as you prefer. Please see next chapters on how to update different sections of a webquest.
- When I adapt/copy a webquest from zunal, will it have original author information?
No, original author info will not be loaded (you can add if you want to). - When I adapt/copy a webquest from zunal, will it have note, link, or information that explains that the webquest is copied/adapted?
No. - What happens if original WebQuest is deleted, modified after I copy/adapt.
Because you will have duplicated files, it will not effect your WebQuest. - Can I add/delete to my adapted/copied webquest?
You can change it anyway you want. add/delete pages, images. files, add new modules, hide pages, change content etc.
WebQuest Menu
Overview
This is always the first page for any webquest published at ZUNAL (like an index page). This page simply displays information about the webquest including title, description, grade level, curriculum area and keyword information for each webquest. This page is extremely critical since it contains vital information for your webquest (helps for search engines and visitors). Each area of this page can easily be updated/configured. Below you will see a sample "Title Page" and instructions on how to change this page section by section.

Figure 1. Screenshot of "Title Page".
Update image
In addition to information regarding your webquest, you can also upload an image/photo for your webquest which will appear on top of your page. Almost all of our users do this because it helps the reader and looks professional. Of course, the image needs to be related to page/webquest content and saved on your computer first. Please try copyright-free websites for image search. You do not need to worry about image size since it will automatically re-sized for best fit-design. Uploading image is very easy. Click on "Update Image" button. A new window will appear that will prompt you to select your photo/image file from your computer.
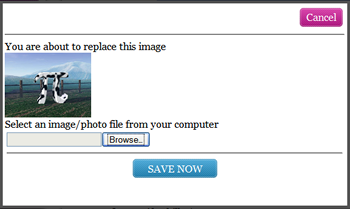
Figure 2. Screenshot of "Update Image" on Title Page.
Once selected, please click on "Save Now". Your image will automatically be uploaded, re-sized and placed on your page. You can always come back and change the image/photo.
Update content
In order to change the title, description, grade level, curriculum area, and keyword information for your webquest, you need to use the button "Change Content". This will let you change the content of your page on a pop up window. A page similar to one below will appear.
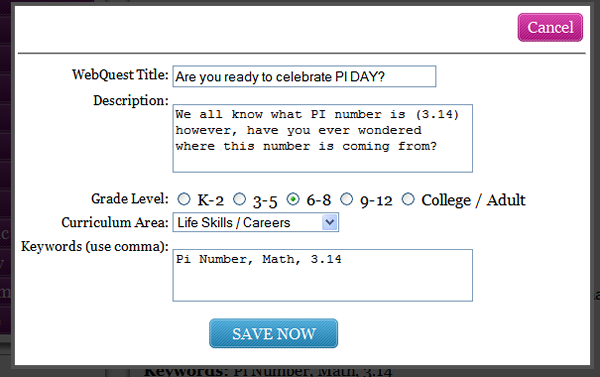
Figure 3. Screenshot of "Change Content" on Title Page.
- WebQuest Title: Choose a short and meaningful title that describes your webquest
- Description: Provide detailed information regarding your webquest
- Grade Level: Choose a grade level (one option).
- Curriculum Area: Select your subject
- Keywords: Provide as many keywords as possible so that your webquest can be found when searched with these keywords at ZUNAL very easily.
Preview/admin mode
This will let you preview your page/webquest before publishing it online (it will remove all admin buttons so that you can see what visitors will see). You can change it to Admin mode anytime.
Resources
You can add unlimited number of resources for this page including files, images, photos, youtube videos, audios etc. Please see Resources Section for details.
- How many images can I upload on this page ?
Only one that will display automatically. However, you can also attach other files, videos etc. if you need to (using resources)
Overview
The purpose of this section is to both prepare and hook the reader. The student is the intended audience. It orients the learner to the task ahead and grabs their interest, drawing them into the project. A good introduction makes the topic seem... * relevant to the learner's past experience * relevant to the learner's future goals * attractive, visually interesting * important because of its global implications * urgent, because of the need for a timely solution * fun, because the learner will be playing a role or making something.
Write a short paragraph here to introduce the activity or lesson to the students. If there is a role or scenario involved (e.g., "You are a detective trying to identify the mysterious poet.") then here is where you'll set the stage. It is also in this section that you'll communicate the Big Question (Essential Question, Guiding Question) that the whole WebQuest is centered around.
Update image
Uploading/Updating an image for your page is very easy. Click on "Update Image" button. A new window will appear that prompts you to select your photo/image file from your computer.
Figure 2. Screenshot of "Update Image" on Title Page.
Once selected, please click on "Save Now". Your image will automatically be uploaded, re-sized and placed on your page. You can always come back and change the image/photo.
Update content
Adding/Updating page content is possible via "Update Content " button. once clicked, you will get to a windows where you will be able to add/update content for your current page. 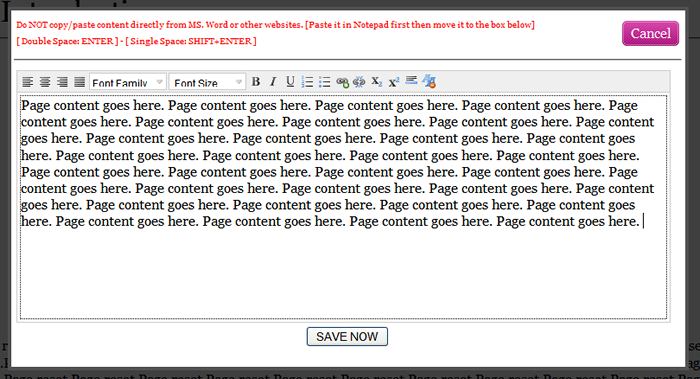
Figure 2. Screenshot of "Update Image" on Title Page.
Once completed, please click on "Save Now". Your page content will automatically be added/updated and placed on your page. You can always come back and change the content.
Attention: Please do not copy/paste from Microsoft Word or from other websites directly into this content box. Doing so, will bring unwanted/malicious (styles, javascripts etc. code to your page and break/lock your page. However, if you really have to get the content from Word or other websites, please make sure to paste the content to Notepad first and move it to the content box. Notepad will remove all the styles and javascripts. If you make a mistake and your page is now locked (you cannot edit it anymore), please use reset button to remove the content.
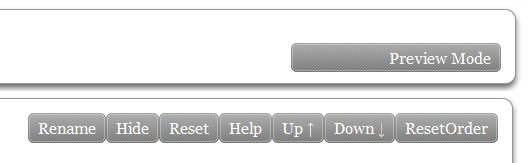
Figure. Screenshot of "Page Bar" located on each page.
- Rename: This will let you rename your menu label for this page. Short Menu Item refers to your menu located on the left bar, and Long Menu Item refers to Page Title on top. You can change these anytime.
- Hide/Show: This will let you hide/show your page from visitors. This way, even though you have a page with content on your WebQuest, you can hide it from visitors when you publish it.
- Reset: This will let you remove the content of your current page. This is only necessary when your page gets stuck that you can not update anymore because of copying pasting directly from other websites or a Microsoft Word document that brings unwanted code into your page. Remember, resetting a page means deleting the content. Of course, there will be a warning before deletion.
- Help: This will let you get Help about the page you are on.
- Up: This will let you move your page one level up on your WebQuest menu.
- Down: This will let you move your page one level down on your WebQuest menu.
- Reset Order : If your pages seem out of order you can Reset the Order and move your pages up and down again.
- Preview/Admin Mode: This will let you preview your page/webquest before publishing it online (it will remove all admin buttons so that you can see what visitors will see). You can change it to Admin mode anytime.
Adding Resources
You can add unlimited number of resources for this page including files, images, photos, youtube videos, audios etc. Please see Resources Section for details.
- How many resources can I add to my page?
Unlimited.
Overview
The task focuses learners on what they are going to do - specifically, the culminating performance or product that drives all of the learning activities. Describe crisply and clearly what the end result of the learners' activities will be. Don't list the steps that students will go through to get to the end point. That belongs in the Process section.
Update image
Uploading/Updating an image for your page is very easy. Click on "Update Image" button. A new window will appear that prompts you to select your photo/image file from your computer.
Figure 2. Screenshot of "Update Image" on Tasks Page.
Once selected, please click on "Save Now". Your image will automatically be uploaded, re-sized and placed on your page. You can always come back and change the image/photo.
Update content
Adding/Updating page content is possible via "Update Content " button. once clicked, you will get to a windows where you will be able to add/update content for your current page.
Figure 2. Screenshot of "Update Image" on Tasks Page.
Once completed, please click on "Save Now". Your page content will automatically be added/updated and placed on your page. You can always come back and change the content.
Attention: Please do not copy/paste from Microsoft Word or from other websites directly into this content box. Doing so, will bring unwanted/malicious (styles, javascripts etc. code to your page and break/lock your page. However, if you really have to get the content from Word or other websites, please make sure to paste the content to Notepad first and move it to the content box. Notepad will remove all the styles and javascripts. If you make a mistake and your page is now locked (you cannot edit it anymore), please use reset button to remove the content.
Figure. Screenshot of "Page Bar" located on each page.
- Rename: This will let you rename your menu label for this page. Short Menu Item refers to your menu located on the left bar, and Long Menu Item refers to Page Title on top. You can change these anytime.
- Hide/Show: This will let you hide/show your page from visitors. This way, even though you have a page with content on your WebQuest, you can hide it from visitors when you publish it.
- Reset: This will let you remove the content of your current page. This is only necessary when your page gets stuck that you can not update anymore because of copying pasting directly from other websites or a Microsoft Word document that brings unwanted code into your page. Remember, resetting a page means deleting the content. Of course, there will be a warning before deletion.
- Help: This will let you get Help about the page you are on.
- Up: This will let you move your page one level up on your WebQuest menu.
- Down: This will let you move your page one level down on your WebQuest menu.
- Reset Order : If your pages seem out of order you can Reset the Order and move your pages up and down again.
- Preview/Admin Mode: This will let you preview your page/webquest before publishing it online (it will remove all admin buttons so that you can see what visitors will see). You can change it to Admin mode anytime.
Adding Resources
You can add unlimited number of resources for this page including files, images, photos, youtube videos, audios etc. Please see Resources Section for details.
- How many resources can I add to my page?
Unlimited.
Overview
This section outlines how the learners will accomplish the task. Scaffolding includes clear steps, resources, and tools for organizing information. To accomplish the task, what steps should the learners go through?...Learners will access the on-line resources that you've identified as they go through the Process....In the Process block, you might also provide some guidance on how to organize the information gathered.
The Process block in a WebQuest is where the teacher suggests steps learners should go through in completing the task. It may include strategies for dividing the task into subtasks, descriptions of roles to be played or perspectives to be taken by each learner. The instructor can also use this place to provide learning advice and interpersonal process advice, such as how to conduct a brainstorming session. The Process description should be relatively short and clear.
Update image
Uploading/Updating an image for your page is very easy. Click on "Update Image" button. A new window will appear that prompts you to select your photo/image file from your computer.
Figure 2. Screenshot of "Update Image" on Title Page.
Once selected, please click on "Save Now". Your image will automatically be uploaded, re-sized and placed on your page. You can always come back and change the image/photo.
Update content
Adding/Updating page content is possible via "Update Content " button. once clicked, you will get to a windows where you will be able to add/update content for your current page.
Figure 2. Screenshot of "Update Image" on Title Page.
Once completed, please click on "Save Now". Your page content will automatically be added/updated and placed on your page. You can always come back and change the content.
Attention: Please do not copy/paste from Microsoft Word or from other websites directly into this content box. Doing so, will bring unwanted/malicious (styles, javascripts etc. code to your page and break/lock your page. However, if you really have to get the content from Word or other websites, please make sure to paste the content to Notepad first and move it to the content box. Notepad will remove all the styles and javascripts. If you make a mistake and your page is now locked (you cannot edit it anymore), please use reset button to remove the content.
Figure. Screenshot of "Page Bar" located on each page.
- Rename: This will let you rename your menu label for this page. Short Menu Item refers to your menu located on the left bar, and Long Menu Item refers to Page Title on top. You can change these anytime.
- Hide/Show: This will let you hide/show your page from visitors. This way, even though you have a page with content on your WebQuest, you can hide it from visitors when you publish it.
- Reset: This will let you remove the content of your current page. This is only necessary when your page gets stuck that you can not update anymore because of copying pasting directly from other websites or a Microsoft Word document that brings unwanted code into your page. Remember, resetting a page means deleting the content. Of course, there will be a warning before deletion.
- Help: This will let you get Help about the page you are on.
- Up: This will let you move your page one level up on your WebQuest menu.
- Down: This will let you move your page one level down on your WebQuest menu.
- Reset Order : If your pages seem out of order you can Reset the Order and move your pages up and down again.
- Preview/Admin Mode: This will let you preview your page/webquest before publishing it online (it will remove all admin buttons so that you can see what visitors will see). You can change it to Admin mode anytime.
Adding Resources
You can add unlimited number of resources for this page including files, images, photos, youtube videos, audios etc. Please see Resources Section for details.
- How many resources can I add to my page?
Unlimited.
Overview
This section describes the evaluation criteria needed to meet performance and content standards. Describe to the learners how their performance will be evaluated. The assessment rubric(s) should align with the culminating project or performance, as outlined in the task section of the WebQuest. Specify whether there will be a common grade for group work vs. individual grades. Clearly, if we're going to justify the expense of using the web for learning, we need to be able to measure results. Since the learning we're looking for is at the loftier reaches of Bloom's Taxonomy, an alternate evaluation is needed, such as a rubric. The rubric is an authentic assessment tool which is particularly useful in assessing criteria which are complex and subjective.
There are many ways to include an evaluation tool at ZUNAL.
- Using "Page Content" Section: You can write up your entire evaluation process in the "Content" section. This could be done with text/table (see update content section below).
- Using ZUNAL evaluation rubric. ZUNAL provides a set 4X4 rubric for you. All you need to do is to update each row (see update rubric section below).
- Attach your evaluation as a resource. If you have a unique evaluation process/tool, you can provide that as an attachment (word, powerpoint, excel etc.) (see resources section).
- Using Table/Rubric Module: Have a rubric bigger than 4X4 standard rubric table. No worries, you can use Table/Rubric module (see table/rubric module section).
Regardless of your options, you need to make sure to explain clearly how your "Evaluation" process/criteria works on your webquest.
Update image
Uploading/Updating an image for your page is very easy. Click on "Update Image" button. A new window will appear that prompts you to select your photo/image file from your computer.
Figure 2. Screenshot of "Update Image" on Evaluation Page.
Once selected, please click on "Save Now". Your image will automatically be uploaded, re-sized and placed on your page. You can always come back and change the image/photo.
Update content
Adding/Updating page content is possible via "Update Content " button. once clicked, you will get to a windows where you will be able to add/update content for your current page.
Figure 2. Screenshot of "Update Image" on Evaluation Page.
Once completed, please click on "Save Now". Your page content will automatically be added/updated and placed on your page. You can always come back and change the content.
Update evaluation rubric
Adding/Updating evaluation rubric is possible via "Update Buttons" located next to each row. once clicked, you will get to a windows where you will be able to add/update content for your current
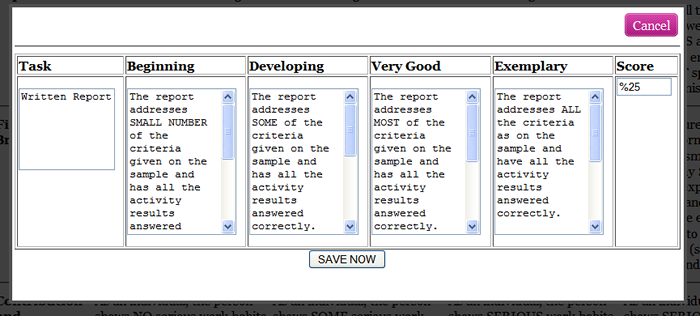
Figure 2. Screenshot of "Update Rubric" on Evaluation Page.
Once completed, please click on "Save Now". Your page content will automatically be added/updated and placed on your page. You can always come back and change the content.
Figure. Screenshot of "Page Bar" located on each page.
- Rename: This will let you rename your menu label for this page. Short Menu Item refers to your menu located on the left bar, and Long Menu Item refers to Page Title on top. You can change these anytime.
- Hide/Show: This will let you hide/show your page from visitors. This way, even though you have a page with content on your WebQuest, you can hide it from visitors when you publish it.
- Reset: This will let you remove the content of your current page. This is only necessary when your page gets stuck that you can not update anymore because of copying pasting directly from other websites or a Microsoft Word document that brings unwanted code into your page. Remember, resetting a page means deleting the content. Of course, there will be a warning before deletion.
- Help: This will let you get Help about the page you are on.
- Up: This will let you move your page one level up on your WebQuest menu.
- Down: This will let you move your page one level down on your WebQuest menu.
- Reset Order : If your pages seem out of order you can Reset the Order and move your pages up and down again.
- Preview/Admin Mode: This will let you preview your page/webquest before publishing it online (it will remove all admin buttons so that you can see what visitors will see). You can change it to Admin mode anytime.
Adding Resources
You can add unlimited number of resources for this page including files, images, photos, youtube videos, audios etc. Please see Resources Section for details.
- How many resources can I add to my page?
Unlimited.
Overview
The conclusion brings closure and encourages reflection. From the WebQuest template: Summarize what the learners will have accomplished or learned by completing this activity or lesson. You might also include some rhetorical questions or additional links to encourage them to extend their thinking into other content beyond this lesson.
The Conclusion section of a WebQuest provides an opportunity to summarize the experience, to encourage reflection about the process, to extend and generalize what was learned, or some combination of these. It's not a critically important piece, but it rounds out the document and provides that reader with a sense of closure. One good use for the conclusion section is to suggest questions that a teacher might use in a whole class discussion to debrief a lesson.
Update image
Uploading/Updating an image for your page is very easy. Click on "Update Image" button. A new window will appear that prompts you to select your photo/image file from your computer.
Figure 2. Screenshot of "Update Image" on Conclusion Page.
Once selected, please click on "Save Now". Your image will automatically be uploaded, re-sized and placed on your page. You can always come back and change the image/photo.
Update content
Adding/Updating page content is possible via "Update Content " button. once clicked, you will get to a windows where you will be able to add/update content for your current page.
Figure 2. Screenshot of "Update Image" on Conclusion Page.
Once completed, please click on "Save Now". Your page content will automatically be added/updated and placed on your page. You can always come back and change the content.
Attention: Please do not copy/paste from Microsoft Word or from other websites directly into this content box. Doing so, will bring unwanted/malicious (styles, javascripts etc. code to your page and break/lock your page. However, if you really have to get the content from Word or other websites, please make sure to paste the content to Notepad first and move it to the content box. Notepad will remove all the styles and javascripts. If you make a mistake and your page is now locked (you cannot edit it anymore), please use reset button to remove the content.
Figure. Screenshot of "Page Bar" located on each page.
- Rename: This will let you rename your menu label for this page. Short Menu Item refers to your menu located on the left bar, and Long Menu Item refers to Page Title on top. You can change these anytime.
- Hide/Show: This will let you hide/show your page from visitors. This way, even though you have a page with content on your WebQuest, you can hide it from visitors when you publish it.
- Reset: This will let you remove the content of your current page. This is only necessary when your page gets stuck that you can not update anymore because of copying pasting directly from other websites or a Microsoft Word document that brings unwanted code into your page. Remember, resetting a page means deleting the content. Of course, there will be a warning before deletion.
- Help: This will let you get Help about the page you are on.
- Up: This will let you move your page one level up on your WebQuest menu.
- Down: This will let you move your page one level down on your WebQuest menu.
- Reset Order : If your pages seem out of order you can Reset the Order and move your pages up and down again.
- Preview/Admin Mode: This will let you preview your page/webquest before publishing it online (it will remove all admin buttons so that you can see what visitors will see). You can change it to Admin mode anytime.
Adding Resources
You can add unlimited number of resources for this page including files, images, photos, youtube videos, audios etc. Please see Resources Section for details.

- How many resources can I add to my page?
Unlimited.
Overview
The teacher page includes information to help other teachers implement the Webquest, including: target learners, standards, notes for teaching the unit, and, in some cases, examples of student work. The teacher page section of a WebQuest provides additional information to any teacher who might want to use the same WebQuest in their own classroom. This page is helpful in providing data needed for lesson plans.
Update image
Uploading/Updating an image for your page is very easy. Click on "Update Image" button. A new window will appear that prompts you to select your photo/image file from your computer.
Figure 2. Screenshot of "Update Image" on Teacher Page.
Once selected, please click on "Save Now". Your image will automatically be uploaded, re-sized and placed on your page. You can always come back and change the image/photo.
Update content
Adding/Updating page content is possible via "Update Content " button. once clicked, you will get to a windows where you will be able to add/update content for your current page.
Figure 2. Screenshot of "Update Image" on Teacher Page.
Once completed, please click on "Save Now". Your page content will automatically be added/updated and placed on your page. You can always come back and change the content.
Attention: Please do not copy/paste from Microsoft Word or from other websites directly into this content box. Doing so, will bring unwanted/malicious (styles, javascripts etc. code to your page and break/lock your page. However, if you really have to get the content from Word or other websites, please make sure to paste the content to Notepad first and move it to the content box. Notepad will remove all the styles and javascripts. If you make a mistake and your page is now locked (you cannot edit it anymore), please use reset button to remove the content.
- Hide/Show: This will let you hide/show your page from visitors. This way, even though you have a page with content on your WebQuest, you can hide it from visitors when you publish it.
- Rename: This will let you rename your menu label for this page. Short Menu Item refers to your menu located on the left bar, and Long Menu Item refers to Page Title on top. You can change these anytime.
- Reset: This will let you remove the content of your current page. This is only necessary when your page gets stuck that you can not update anymore because of copying pasting directly from other websites or a Microsoft Word document that brings unwanted code into your page. Remember, resetting a page means deleting the content. Of course, there will be a warning before deletion.
- Preview/Admin Mode: This will let you preview your page/webquest before publishing it online (it will remove all admin buttons so that you can see what visitors will see). You can change it to Admin mode anytime.
Adding Resources
You can add unlimited number of resources for this page including files, images, photos, youtube videos, audios etc. Please see Resources Section for details.
- How many resources can I add to my page?
Unlimited.
Overview
This section is for you to list the creators of the webquest (you, your team members etc.). You can add as many authors you want or update/remove them later. You can also upload a photo of each author as well.
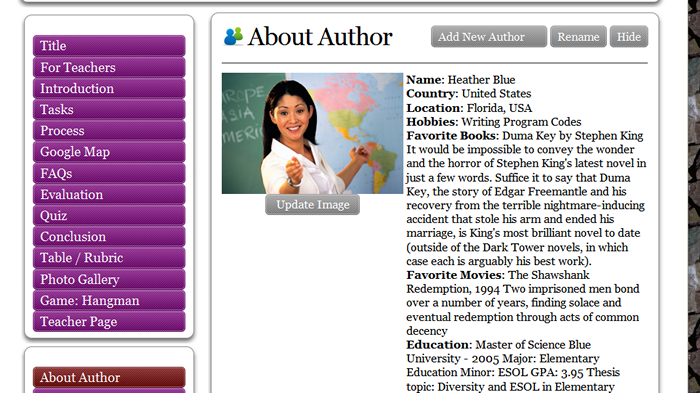
Figure 1. Screenshot from "About Author(s)" page
Add/update author information
Click on "Add New Author" button and provide information for each author. You can always come back and update the information.
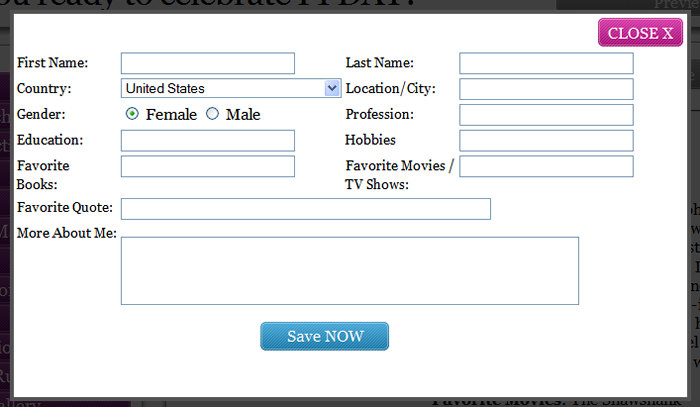
Figure 2. Screenshot of "Add New Author" function on "About Author(s)" Page.
In order to update author information, you need to click on "Update" button next to each author you have added.
Figure 3. Screenshot of "Update" function on "About Author(s)" Page.
Add/update author photo
Adding/updating author photo is possible via "Update Image " button located for each author. (You always need to add author first.)
Once clicked, you will get to a windows where you will be
able to choose an image (photo) from your computer for each author (see below).
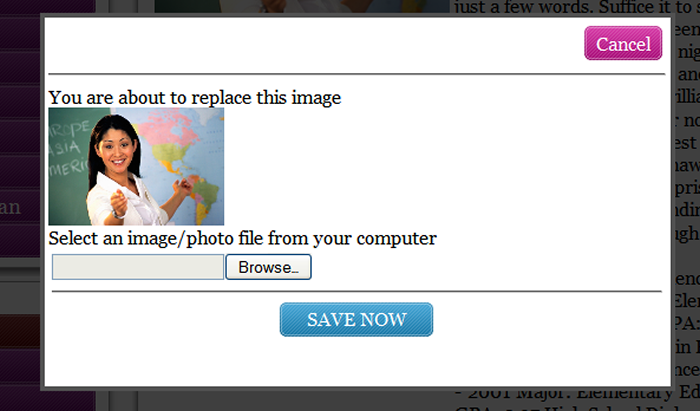
Figure 2. Screenshot of "Update Image" on "About Author(s)" Page.
Once selected, please click on "Save Now". Your image/photo will automatically be uploaded, re-sized and placed on your page. You can always come back and change the image/photo.
Delete an author
In order to delete an existing author from your webquest, simply click on "Delete" button.
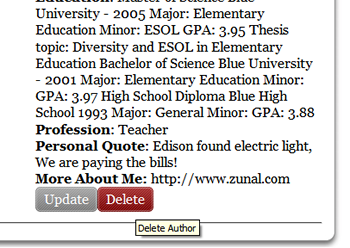
Figure 2. Screenshot of "Delete Author" function on "About Author(s)" Page.
Once clicked, you will receive a warning about the deletion and you will be asked to confirm "Delete" action. Once confirmed, author info and photo will be deleted.
Figure. Screenshot of "Page Bar" located on each page.
- Rename: This will let you rename your menu label for this page. Short Menu Item refers to your menu located on the left bar, and Long Menu Item refers to Page Title on top. You can change these anytime.
- Hide/Show: This will let you hide/show your page from visitors. This way, even though you have a page with content on your WebQuest, you can hide it from visitors when you publish it.
- Reset: This will let you remove the content of your current page. This is only necessary when your page gets stuck that you can not update anymore because of copying pasting directly from other websites or a Microsoft Word document that brings unwanted code into your page. Remember, resetting a page means deleting the content. Of course, there will be a warning before deletion.
- Help: This will let you get Help about the page you are on.
- Up: This will let you move your page one level up on your WebQuest menu.
- Down: This will let you move your page one level down on your WebQuest menu.
- Reset Order : If your pages seem out of order you can Reset the Order and move your pages up and down again.
- Preview/Admin Mode: This will let you preview your page/webquest before publishing it online (it will remove all admin buttons so that you can see what visitors will see). You can change it to Admin mode anytime.
- How many authors can I add?
Unlimited.
Overview
In addition to the standard pages and additional modules, ZUNAL also provides you a space to attach your files, images, website links, music files, or videos to your webquest. You can add unlimited number of resources to any of your webquest pages (or all). If it is a website, file, or image ZUNAL will create a hyperlink, if it is a video ZUNAL will prepare it for you to autoshow/autoplay, if it is an audio file, it will play on page load. Please see below different resources you can attach to your webquest and how to attach them. While creating/updating your webquest, you will see a section in the bottom of almost every single webquest page 9introduction, tasks, process etc.) called "Resources". Using this section, you can add as many resources as you want.
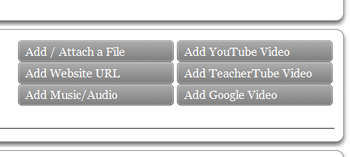
Figure 1. Available type of resources to be attach to a webquest.
Add/attach a file
You can attach files (word, excel, powerpoint etc.) by clicking on the "Add/Attach a File" button. (You must have your file on your computer). You can also add a description of your file so that it provides brief information about your file.

Figure 2. Screenshot of "Add/Attach a File" function on "Resources" page.
Add website url
You can also attach website addresses so that ZUNAL creates automatic clickable links for you and your visitors. Select "Add/Attach a Website URL " button and enter the URL, title of website and a description of the website. Once saved, ZUNAL will take care of the rest.

Figure 2. Screenshot of "Add/Attach a Website URL " function on "Resources" page.
Add music/audio
Sometimes webquest creators prefer a music or an audio file to autoplay when the page loads (for example: national anthem for a country, background music for a long reading, or special effects for your webquest etc.). Regardless of your reason, you can attach page autoload music URL's from youtube to your webquest. Here is how it works.
- You find a music/video file at youtube and copy URL (video is ok - ZUNAL will play only audio part of the file).
- Come back to ZUNAL and add the URL to your webquest as an audio resource
- Once page loads, your audio file located at youtube will automatically load an play.
Figure 2. Screenshot of "Add Music/Audio " function on "Resources" page.
Remember, only urls from youtube will autoplay. (This is a trick that ZUNAL hides video and plays only audio as soon as page loads without user interaction.
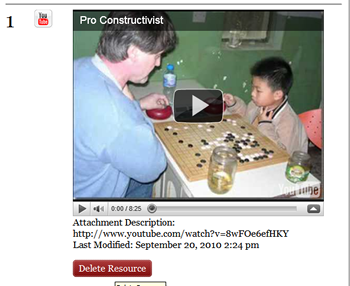
Add/attach youtube video
Adding YouTube videos to your webquest is a click away (www.youtube.com). ZUNAL will automatically embedded the video into your webquest so that users will never leave your webquest. Of course, first, you need to find/identify the video you would like to attach to your webquest. Once you are ready with the url for the video, click on "Add YouTube Video" on the resources page and provide a description and the url in the box.
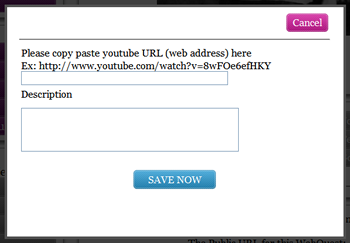
ZUNAL will automatically prepare your page and have your video ready playable without leaving your webquest. You can preview or view your attached videos as soon as you save the links.

Add/attach teachertube video
You can also attach videos from TeacherTube website (www.teachertube.com). ZUNAL will automatically embedded the video into your webquest so that users will never leave your webquest. Of course, first, you need to find/identify the video you would like to attach to your webquest. Once you are ready with the url for the video, click on "Add TeacherTube Video" on the resources page and provide a description and the url in the box.
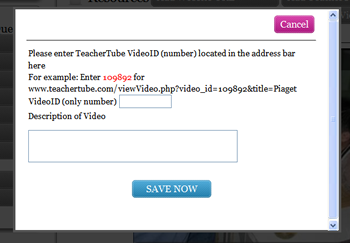
ZUNAL will automatically prepare your page and have your video ready playable without leaving your webquest. You can preview or view your attached videos as soon as you save the links.

Add/attach google video
You can also attach videos from Google Video website (www.google.com/videos). ZUNAL will automatically embedded the video into your webquest so that users will never leave your webquest. Of course, first, you need to find/identify the video you would like to attach to your webquest. Once you are ready with the url for the video, click on "Add Google Video" on the resources page and provide a description and the url in the box.
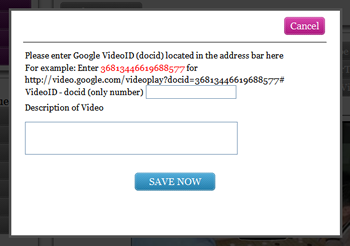
ZUNAL will automatically prepare your page and have your video ready playable without leaving your webquest. You can preview or view your attached videos as soon as you save the links.
Update resources
Under each resource, you will see a button to help you update your resource (change description / order). Clicking once will get you to screen where you will be able to change the description of the resource and order of your resource.
Delete resources
Under each resource, you will see a button to help you delete resource from your webquest. Clicking once will get you a warning page asking you to confirm before deletion.
- How many resources can I add ?
Unlimited.
Options
Overview
Once your WebQuest is published, visitors will be able to post reviews and rate your WebQuest. Reviews and ratings will not be public before your confirmation. For each review, you will receive an automatic email so that you can login and confirm/delete reviews.
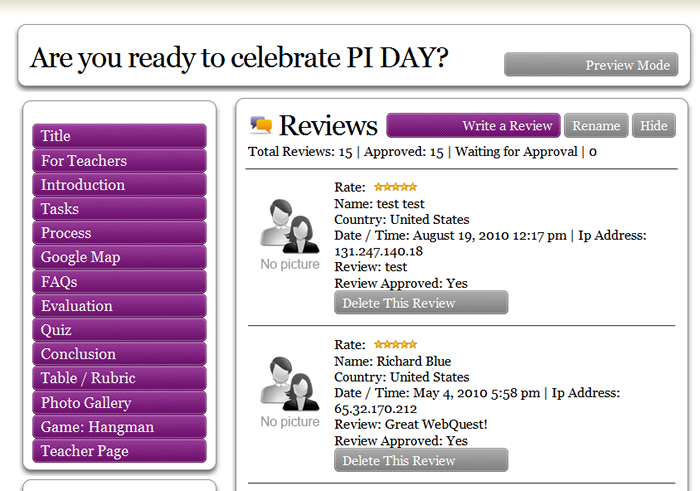
Figure 1. Screenshot of "Reviews" page.
Add a review
Account holders (including you) that are logged in can post a review for webquests located at ZUNAL using the button "Write a Review" located on the reviews page. Currently users can rate your webquest with a 5-start scale and/or post a narrative reviews. However, as the owner of the webquest, you will be asked to approve each review so that they can be publicly available under your werbquest.
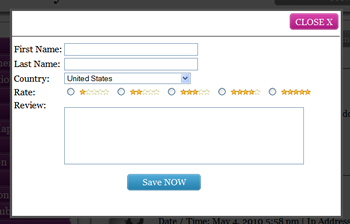
Figure 2. Screenshot of "Write a Review" function on "Reviews" page.
Approve submitted reviews
If you receive a review from any person, you have top options. You can approve the review or simply delete it (if it is spam etc.). Any approved reviews/ratings will be available to public.
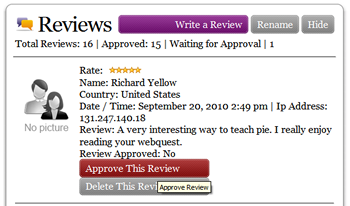
Figure 3. Screenshot of "Approve This Review" function on "Reviews" page.
Delete reviews
Next to each review, you will see a button that reads "Delete This Review". Using this button, you can delete any comment posted for your webquest.
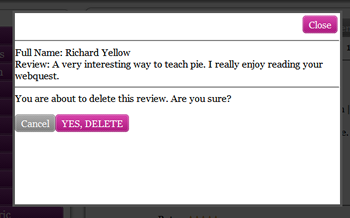
Figure 4. Screenshot of "Delete This Review" function on "Reviews" page.
- Hide/Show: This will let you hide/show your page from visitors. This way, even though you have a page with content on your WebQuest, you can hide it from visitors when you publish it.
- Rename: This will let you rename your menu label for this page. Short Menu Item refers to your menu located on the left bar, and Long Menu Item refers to Page Title on top. You can change these anytime.
- Preview/Admin Mode: This will let you preview your page/webquest before publishing it online (it will remove all admin buttons so that you can see what visitors will see). You can change it to Admin mode anytime.
- How many reviews can I receive?
Unlimited. - How many reviews can I submit?
Unlimited.
Overview
"Statistics" page will let you view the visitor statistics for each page and calculate the average number of visits for your WebQuest (number of unique visits page by page). You will be able to reset counter anytime.

Figure 1. Screenshot of "Statistics" page.
View Statistics
Your statistcs will start working as soon as you publish your webquest (counters on unpublished webquests will not increment). Once published, zunal will start recoring your visitors and their date/time of visit. At anytime, you can come back to your webquest and view how many visits you received for your webquest.
Figure 2. Screenshot of "Statistics" page.
Reset Counters
If Some users prefer to reset their counters so that they start from fresh. You can do this by clicking on Reset button. All numbers will be zeroed.
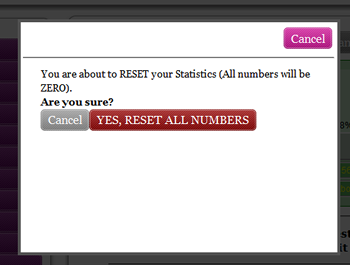
Figure 3. Screenshot of "Reset Counter" function on "Statistics" page.
- Hide/Show: This will let you hide/show your page from visitors. This way, even though you have a page with content on your WebQuest, you can hide it from visitors when you publish it.
- Rename: This will let you rename your menu label for this page. Short Menu Item refers to your menu located on the left bar, and Long Menu Item refers to Page Title on top. You can change these anytime.
- Preview/Admin Mode: This will let you preview your page/webquest before publishing it online (it will remove all admin buttons so that you can see what visitors will see). You can change it to Admin mode anytime.
- Do visitors have to be logged on in order to count their visit for my stats?
They do not have to be logged in. Also your logged in visits will not increase the numbers and refreshing the page to increase the numbers will not increase your numbers
Overview
This page will let you export your WebQuest as a PDF, WORD or Excel document and save it on your computer. This feature is also available to visitors. Once exported, you will be able to email, print, or save a back up of your WebQuest on your computer. The only limitation is that images/pictures/attachments/videos will not be exported.

Figure 1. Screenshot of "Statistics" page.
Export as PDF
Clicking on "PDF Export" button will make a copy of your webquest content (images are not included) and open your webquest is PDF format. This way you can share, print or save a copy of your webquest.
Figure 2. Screenshot of "Export to PDF " page.
Export as Word
Clicking on "Word Export" button will make a copy of your webquest content (images are not included) and open your webquest is Microsoft Word format. This way you can share, print or save a copy of your webquest.
Figure 3. Screenshot of "Export to Word " page.
Export as Excel
Clicking on "Excel Export" button will make a copy of your webquest content (images are not included) and open your webquest is Microsoft Excel format. This way you can share, print or save a copy of your webquest.

Figure 4. Screenshot of "Export to Excel " page
Figure. Screenshot of "Page Bar" located on each page.
- Rename: This will let you rename your menu label for this page. Short Menu Item refers to your menu located on the left bar, and Long Menu Item refers to Page Title on top. You can change these anytime.
- Hide/Show: This will let you hide/show your page from visitors. This way, even though you have a page with content on your WebQuest, you can hide it from visitors when you publish it.
- Reset: This will let you remove the content of your current page. This is only necessary when your page gets stuck that you can not update anymore because of copying pasting directly from other websites or a Microsoft Word document that brings unwanted code into your page. Remember, resetting a page means deleting the content. Of course, there will be a warning before deletion.
- Help: This will let you get Help about the page you are on.
- Up: This will let you move your page one level up on your WebQuest menu.
- Down: This will let you move your page one level down on your WebQuest menu.
- Reset Order : If your pages seem out of order you can Reset the Order and move your pages up and down again.
- Preview/Admin Mode: This will let you preview your page/webquest before publishing it online (it will remove all admin buttons so that you can see what visitors will see). You can change it to Admin mode anytime.
- Can I email my WebQuest in PDF?
Yes, export it as PDF first, save it on your computer and email it to anybody you would like to.
Overview
You can now share any of the WebQuests located on ZUNAL with others via email, on Facebook or Twitter (more to come). Please see below for details.

Figure 1. Screenshot of "Share this WebQuest" page.
Share via Email
One way to share a WebQuest is to email URL of the WebQuest to a person via email. ZUNAL will not only let you email your WebQuest, it will automatically add other details (brief message including url, and title of WebQuest). In order to share a WebQuest via email, click on "Share This WebQuest" button from the left menu and select "Share via Email". On the next window, ZUNAL will ask you to enter email address for "To" and "From" with a template message you can modify. Once you are done, you can submit the form so that ZUNAL will send automatic emails for you.
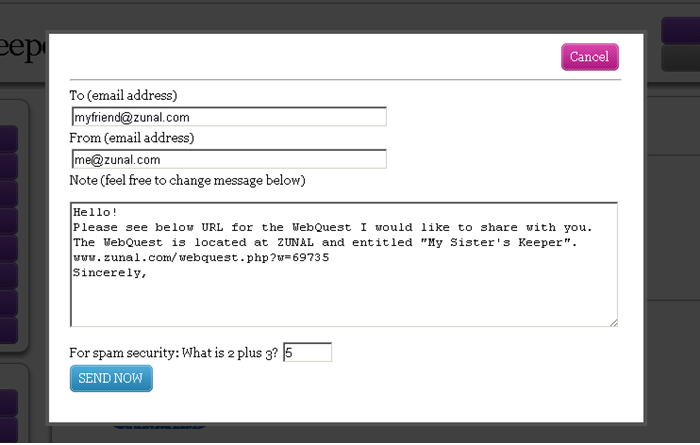
Figure 2. Screenshot of "Share via Email" function on "Share this WebQuest" page.
Share on Facebook
You can share any of the WebQuests located at ZUNAL on Facebook (you need a Facebook account) with one click.
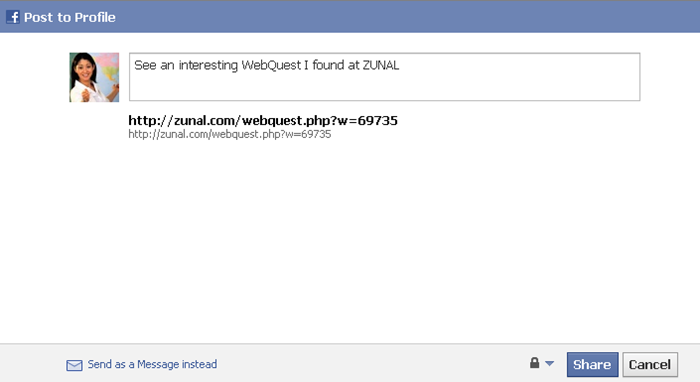
Figure 3. Screenshot of "Share on Facebook" function on "Share this WebQuest" page.
Share on Twitter
You can share any of the WebQuests located at ZUNAL on Twitter (you need a Twitter account) with one click.
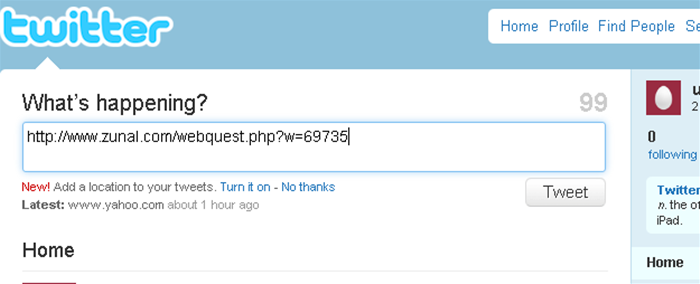
Figure 4. Screenshot of "Share on Twitter" function on "Share this WebQuest" page.
Share on Digg
You can share any of the WebQuests located at ZUNAL on Digg (you need a Digg account) with one click.
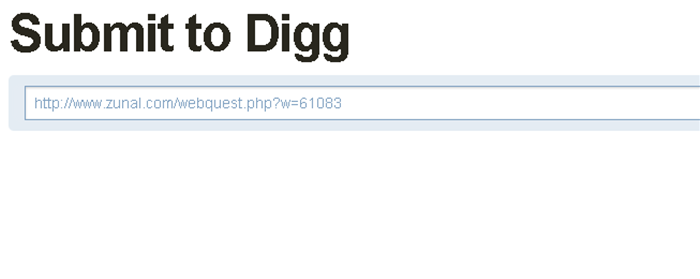
Figure 4. Screenshot of "Share on Digg" function on "Share this WebQuest" page.
- Can I suggest another social website for ZUNAL to consider adding function?
Of course, please submit your request using this link Suggestions for ZUNAL
Modules
Once you create a new WebQuest using ZUNAl WebQuest maker, the system will automatically create all standard pages (Title Page, Introduction, Tasks etc.). However, sometimes your WebQuest needs extra pages that you could not fit into your Standard pages (a page for Curriculum Standards covered on your WebQuest, a page for Credits, a page for Additional Resources etc.). With the New Page module, you will be able to add as many additional pages as you want and update them exactly the way you do other pages (Introduction, Task etc.). Add an image on top, add content text and also attach files, youtube videos etc on each page you add. In addition, you will be able to choose a menu name for your new page (such as "Credits", "Notes to Teachers") and decide where to be place this new page on your WebQuest menu (before Introduction page, after Task page etc. ). Remember, you can always delete a page or hide it from public.
2. Adding New Page to your WebQuest- Make sure that you are logged in
- Go to your WebQuest and find "New Page " tab on the left menu and click on it
- Now hit on "Add a New Page ".

Figure 1. Adding a New Page - You will now be asked for a "Page Title" information for your new Page and select your "Page Location".

Figure 2. New Page Elements - Your Page structure is now created. The page will automatically take you to your New Page so that you can update it.
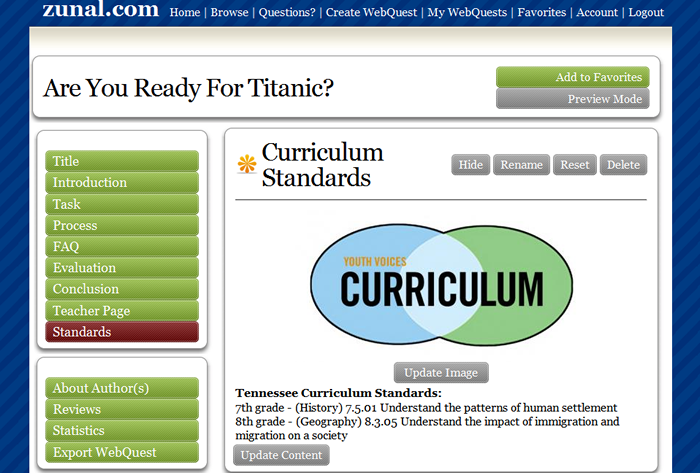
Figure 1. New Page Elements
- Update Image : This will let you add/update image/photo on top of your New Page. You can change it anytime even after you publish your WebQuest.
- Update Content : This will let you update content of your page You can change it anytime even after you publish your WebQuest.
- Hide/Show: This will let you hide/show your page from visitors. This way, even though you have a page with content on your WebQuest, you can hide it from visitors when you publish it.
- Rename: This will let you rename your menu item regarding New Page. Short Menu Item refers to your menu located on the left bar, and Long Menu Item refers to Page Title on Top. You can change these anytime.
- Reset: This will let you remove content of your page. This is only necessary when your page gets stuck that you can not update anymore because of copying pasting directly from other websites or a Microsoft Word document that brings unwanted code into your page. Remember, resetting a page means deleting the contents. There will be a warning before deletion.
- Preview/Admin Mode: This will let you preview your page before publishing it online (it will remove all admin buttons so that you can see what visitors will see). You can change it to Admin mode anytime.
- Delete: This will let you delete your page completely including image, content and resources. There will be a warning page before deletion.
- How many New Page page can I add to my WebQuest?
Unlimited - Can I add picture/photo or attach resources (files, videos) to New Pages?
Yes.
1. Description There are certain situations where you may want to present your data in tabular form. Tables allow you to control where on your page you want different components to appear. You can now add a Table (for example: Creating a Rubric) to your WebQuest where you can list your items/conditions in number of rows and columns. 2. Adding Table / Rubric to your WebQuest
- Make sure that you are logged in
- Go to your WebQuest and find "Table/Rubric" tab on the left menu and click on it
- Now hit on "Add New Table".
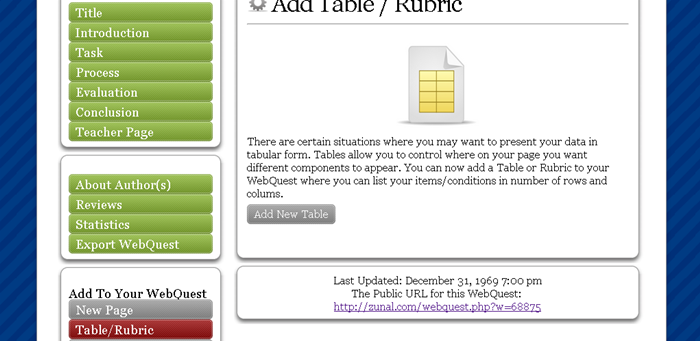
Figure 1. Adding a New Table - You will now be asked for a title for your Table" and number of starting Rows and Columns. This is just to get started.
You can add/delete Row or Columns at anytime after you create it). If you are not sure at this time, just leave it as default. Then press "Create Table".

Figure 2. New Page Elements - Your Table structure is now created. The page will automatically take you to your Table / Rubric Page so that you can update it.
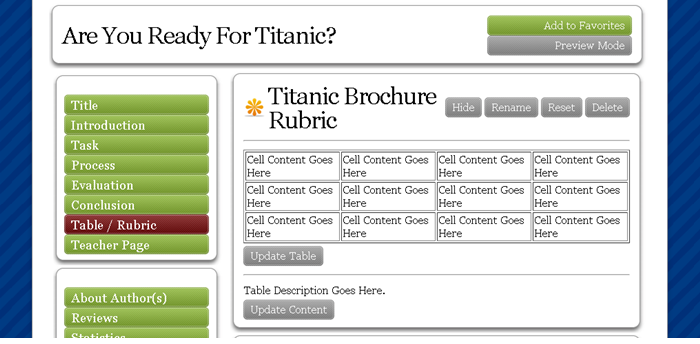
Figure 1. Table / Rubric Elements
- Update Table: This will let you update your table by changing the content of table cells and/or adding/removing rows and/or columns. See below.
- Update Content : This will let you update content of your table page (description of your table/rubric or instructions etc. You can change it anytime even after you publish your WebQuest.
- Hide/Show: This will let you hide/show your page from visitors. This way, even though you have a page with content on your WebQuest, you can hide it from visitors when you publish it.
- Rename: This will let you rename your menu item regarding your Table. Short Menu Item refers to your menu located on the left bar, and Long Menu Item refers to Page Title on Top. You can change these anytime.
- Reset: This will let you remove content of your page. This is only necessary when your page gets stuck that you can not update anymore because of copying pasting directly from other websites or a Microsoft Word document that brings unwanted code into your page. Remember, resetting a page means deleting the contents. There will be a warning before deletion.
- Delete: This will let you delete your page completely including image, content and resources. There will be a warning page before deletion.
- Preview/Admin Mode: This will let you preview your page before publishing it online (it will remove all admin buttons so that you can see what visitors will see). You can change it to Admin mode anytime.
Updating Table Cells
Once you click on Update Table button, you will see a page similar to below. Following the instructions, you will be able to modify your table cells. Update Table page will only be available to you as WebQuest Owner (visitors will see your table but not the page below). 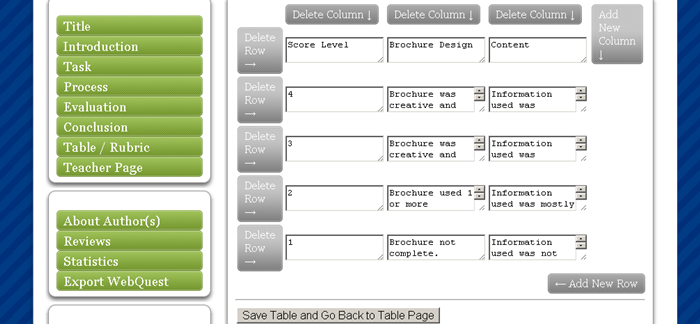
- Delete Row: Next to each row, you will see a "Delete Row" button. This will let you delete corresponding row entirely (not the table) and its contents.
- Delete Column: Next to each column, you will see a "Delete Column" button. This will let you delete corresponding column entirely (not the table) and its contents.
- Add New Row : This will let you add a New Row to your table.
- Add New Column : This will let you add a New Column to your table.
- Save Table and Go Back to Table Page: This will let save your Table and will take you to your Table page.
- How many Table Page can I add to my WebQuest?
One per WebQuest - How many Rows/Columns can I add to my Table?
Unlimited - Can I add picture/photo or attach resources (files, videos) to New Pages?
No.
1. Description In general, a quiz helps determine what students have learned. A well-designed quiz can give critical information about a student's understanding of the material. The Quiz module at ZUNAL is to help you create a quiz for your WebQuest so that you can assess students' previous knowledge (pre-test) or the impact on student learning (post-test).
- You can create a quiz, temporarily activate/de-activate your quiz, or completely delete your quiz at anytime.
- Once you have an active Quiz, your visitors/students can take the quiz online at anytime.
- Quiz module will automatically save all the responses you received. This way, you can analyze the quiz results, print them or delete responses individually as well. The results will be displayed at "See Quiz Results" page.
- The quiz can be taken anonymously or you can ask participants to enter their names or special code(s) before submitting for individual progress reports.
- Please remember, deleting a quiz or changing questions will delete all responses.
- Make sure that you are logged in
- Go to your WebQuest and find "Quiz" tab on the left menu and click on it
- Now hit on "Add Quiz".
- Your Quiz Page structure is now created. The page will automatically take you to your Quiz Page so that you can update your quiz, add questions etc.


Figure 1. Quiz Page Elements
- Update Quiz: This will let you update quiz title and quiz description. You can change it anytime even after you publish your quiz and receive responses (Changing questions is different - see below)
- Delete Quiz: This will let you delete the quiz completely including questions and responses. There will be a warning page before deletion. Please remember, deleting a quiz will delete all the responses you collected (if any).
- Add Question: This will let you add a question for your quiz.
- You can add as many questions as you need.
- Currently, only multiple choice questions can be added.
- Even though five options can be given, you can make it less (3 selections - a, b, c)
- Please do not skip options (bad practice: a, c, d, e leaving b blank).
- Question Point Value is to help you score quizzes and provide different values for each question. For example: You can set low values for easy questions while higher values for hard ones. ZUNAL will automatically calculate the values and overall scores for you.
- You can change your questions anytime before a person takes your quiz. If you change it after you have response(s), you can still change it, but the responses will be deleted.
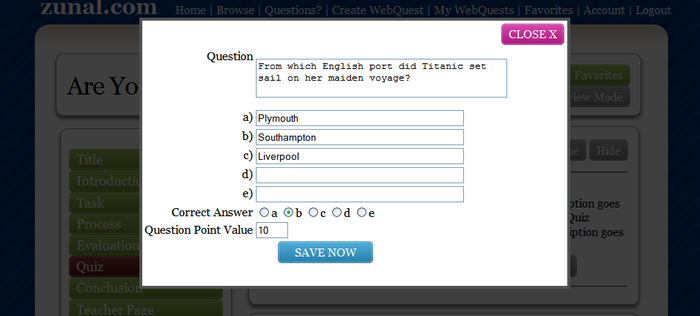
Figure 2. Add a Question
- Quiz Results: This will let you view responses you received so far for your quiz. You can remove responses if you want (one by one or all at once). Quiz results are only available to WebQuest owner. It is not public.
- Hide/Show: This will let you hide/show your quiz page from visitors. This way, even though you have a quiz on your WebQuest, you can hide it from visitors when you publish it.
- Rename: This will let you rename your menu item regarding Quiz page. Short Menu Item refers to your menu located on the left bar, and Long Menu Item refers to Page Title on Top. You can change these anytime.
- Preview/Admin Mode: This will let you preview your Quiz page before publishing it online (it will remove all admin buttons so that you can see what visitors will see). You can change it to Admin mode anytime.
- Testing Your Quiz: You can test your quiz anytime. There are many options. 1 - Take the quiz at the quiz page directly, 2 - Take the quiz at Preview Mode, 3 - Take the quiz after publishing your WebQuest. (make sure to rem eve your responses collected during testing).
- Anonymous vs Name: Your quiz is publicly available as soon as you publish your WebQuest. Since anybody can take your quiz - in order to separate spam, random responses - you can ask your students or group provide a name or a special code to enter while taking the quiz.
- Can I create an open ended question for my quiz?
Not at this time. - How many questions can I add for my quiz?
Unlimited - How many quizzes can I create for my WebQuest?
One for per WebQuest - Can I add picture/photo to my quiz questions?
Not at this time. - Is there a limit on number of quiz takers?
No limit.
1. Description Frequently asked questions, or FAQs are listed questions and answers, all supposed to be frequently asked in some context, and pertaining to a particular topic. You can now add an FAQ page to your WebQuest where you can list your questions and answers regarding your WebQuest, activity etc. 2. Adding FAQ Page to your WebQuest
- Make sure that you are logged in
- Go to your WebQuest and find "FAQs" tab on the left menu and click on it
- Now hit on "Add New FAQ Page ".
- Your FAQ Page structure is now created. The page will automatically take you to your FAQ page so that you can update your page, add questions/answers etc.

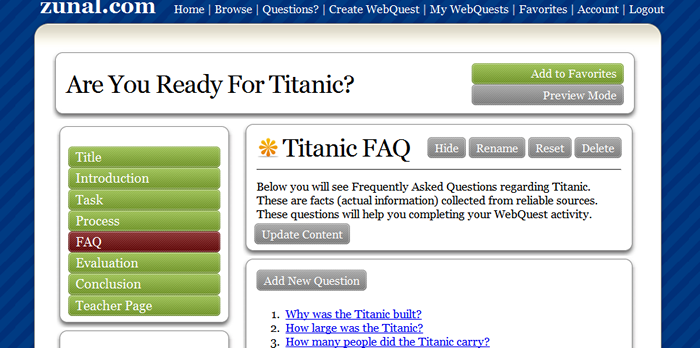
Figure 1. FAQ Page Elements
- Update Content : This will let you update content/description of your FAQ page so that you can provide information regarding your FAQ page and questions. You can change it anytime even after you publish your WebQuest.
- Add New Question: This will let you add a question/answer to your FAQ page.
- You can add as many questions/answers as you need.
- You can change your questions anytime before a person takes your quiz. If you change it after you have response(s), you can still change it, but the responses will be deleted.
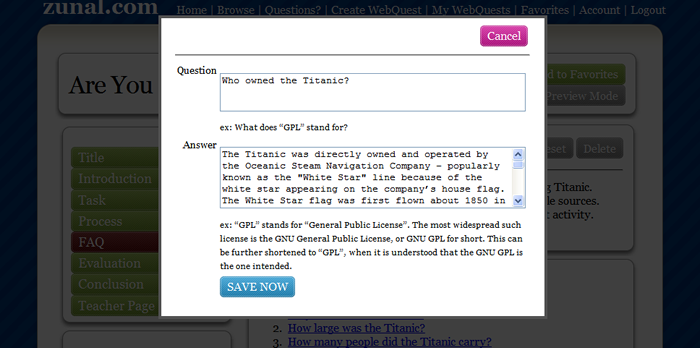
Figure 2. Add a Question/Answer
- Update Question: This will let you update/edit a question/answer on your FAQ page. The button will be available next to each question/answer set.
- Delete Question: This will let you delete a question/answer on your FAQ page. The button will be available next to each question/answer set.
- Hide/Show: This will let you hide/show your FAQ page from visitors. This way, even though you have a FAQ page on your WebQuest, you can hide it from visitors when you publish it.
- Rename: This will let you rename your menu item regarding FAQ page. Short Menu Item refers to your menu located on the left bar, and Long Menu Item refers to Page Title on Top. You can change these anytime.
- Reset: This will let you remove all questions and answers without deleting your FAQ page. This is only necessary when your page gets stuck that you can not update anymore because of copying pasting directly from other websites or a Microsoft Word document that brings unwanted code into your page. Remember, resetting a page means deleting the contents. There will be a warning before deletion.
- Preview/Admin Mode: This will let you preview your FAQ page before publishing it online (it will remove all admin buttons so that you can see what visitors will see). You can change it to Admin mode anytime.
- Delete: This will let you delete this page completely including questions and answers you added to this page. There will be a warning page before deletion.
- How many questions/answers can I add to my FAQ page?
Unlimited - How many FAQ page can I add to my WebQuest?
One for per WebQuest - Can I add picture/photo to my quiz questions?
Not at this time.
1. Description There are certain situations where you may want to collect and show your visitors images/photos related to your WebQuest. Please remember, this is not meant to be a personal photo album. Why create photo gallery? - to show photos of work progress at different times - to show a timeline of historical event - to show before and after photos etc.. 2. Adding Photo Gallery to your WebQuest
- Make sure that you are logged in
- Go to your WebQuest and find "Photo Gallery" tab on the left menu and click on it
- Now hit on "Add New Photo Gallery".
Figure 1. Adding a New Photo Gallery - You will now be asked for description of your "Photo Gallery". (You can change this anytime.).
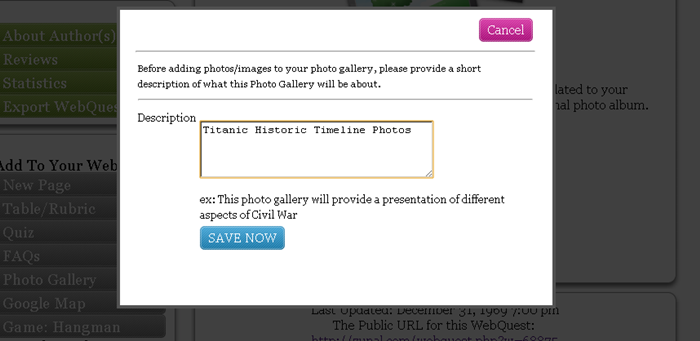
Figure 2. Add Photo Gallery description - Your Photo Gallery structure is now created. The page will automatically take you to your Photo Gallery Page so that you can update it.
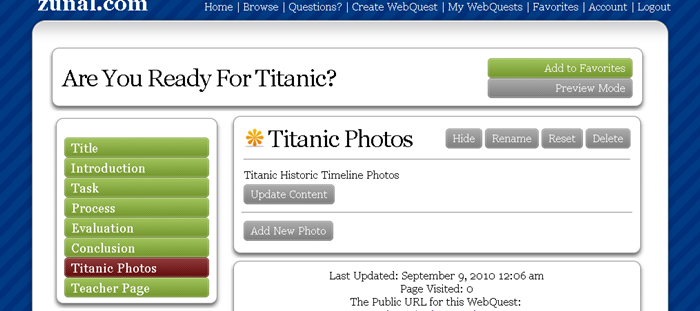
Figure 1. Photo Gallery Elements
- Update Content : This will let you update content of your gallery page (description of your Photo Gallery or instructions etc. You can change it anytime even after you publish your WebQuest.
- Add New Photo : This will let you upload photos from your computer to your Photo Gallery. You must save your photos on your computer first.
- Hide/Show: This will let you hide/show your page from visitors. This way, even though you have a page with content on your WebQuest, you can hide it from visitors when you publish it.
- Rename: This will let you rename your menu item regarding your Photo Gallery. Short Menu Item refers to your menu located on the left bar, and Long Menu Item refers to Page Title on Top. You can change these anytime.
- Reset: This will let you remove content of your page. This is only necessary when your page gets stuck that you can not update anymore because of copying pasting directly from other websites or a Microsoft Word document that brings unwanted code into your page. Remember, resetting a page means deleting the contents. There will be a warning before deletion.
- Delete: This will let you delete your Photo Gallery completely including photos you uploaded. There will be a warning page before deletion.
- Preview/Admin Mode: This will let you preview your gallery before publishing it online (it will remove all admin buttons so that you can see what visitors will see). You can change it to Admin mode anytime.
Adding / Moving Photos
You can add unlimited number of photos on your Photo Gallery. Once uploaded, you can edit description of your photos, remove (delete) your photos or set the order of photos by moving them up and down.
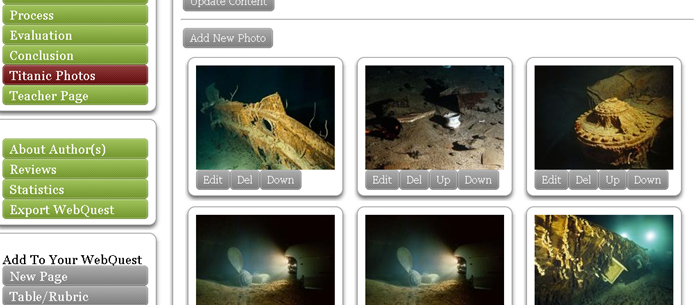
- Edit: Under each photo, you will see a "Edit" button. This will let you update description of each photo. Description is available when you click on a photo.
- Del: Under each photo, you will see a "Del" button. This will let you delete your photo. You will receive a warning before deletion.
- Up : This will let you move your photo one level up (exchange the place of the photo with the previous one).
- Down : This will let you move your photo one level down (exchange the place of the photo with the next one).
Viewing Your Photo Gallery
Your Photo Gallery is created with the thumbnails (shrunk) of your photos. However, clicking on any of the photo will bring a presentation of the photo (with dark background). In the view mode, the description of the photo and available next, previous button will appear. Clicking on photo in view mode or clicking on "ESC" button will close the presentation and take you back to your Photo Gallery (see below).
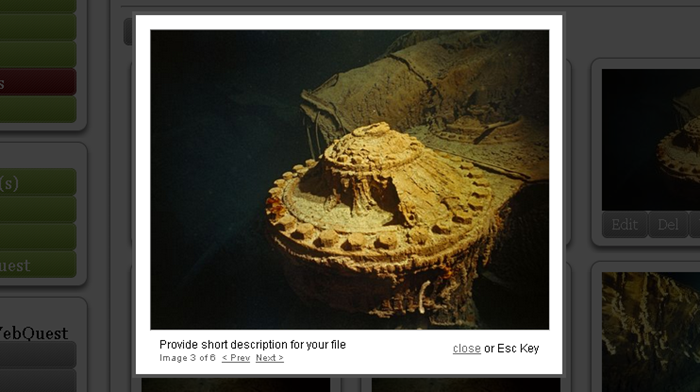
- How many Photo Gallery can I add to my WebQuest?
One per WebQuest - How many photos can I add to my Photo Gallery?
Unlimited - Can I add picture/photo or attach resources (files, videos) to my Photo Gallery?
No.
There are certain WebQuest topics that include geographic locations (WebQuests related to vacation, historical places, travel etc.) and distance which requires you to show your students these locations on a map. While locations can be provided by their name and address, integrating a map with the locations marked automatically can make your WebQuest much more effective and appealing.
Google Map enables you and your students to look up and study addresses anywhere in the U.S. and in many other countries and get point-to-point, draggable directions plotted on an interactive street map. It can be incorporated into variety of WebQuests, from history to geography, social studies and even economics. You can add locations and descriptions and google map module will automatically create a map for you. Features include:
- Enter as many locations as you want (address, only zip code or just the name of the location ex: white house), gmap will automatically create a map.
- Enter description for each location (your own text) and gmap will create links automatically.
- Directions from one location to another with one click.
- Map, satellite or hybrid view and zoom in / zoom out.
- Make sure that you are logged in
- Go to your WebQuest and find "Google Map" tab on the left menu and click on it
- Now hit on "Add Google Map".
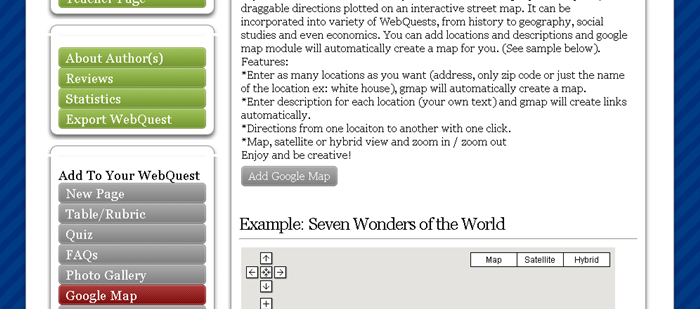
Figure 1. Adding a Google Map - Your Google Map structure is now created. The page will automatically take you to your Google Map Update Page so that you can add content for your page and locations for your Google Map.
- Remember, this page is for you to setup your Map. This page will not be accessible to public. (Your finalized map page will be.)
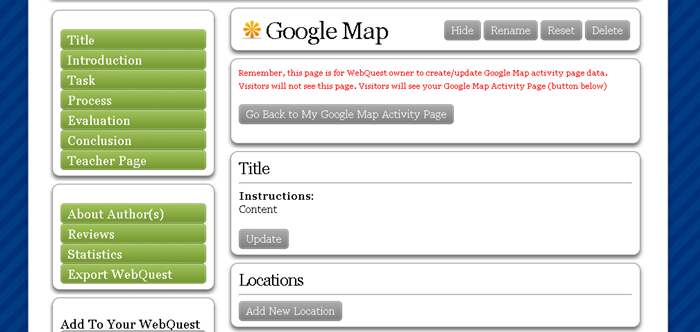
Figure 2. Add Google Map Content and Locations. - Hide/Show: This will let you hide/show your page from visitors. This way, even though you have a page with content on your WebQuest, you can hide it from visitors when you publish it.
- Rename: This will let you rename your menu item regarding your Photo Gallery. Short Menu Item refers to your menu located on the left bar, and Long Menu Item refers to Page Title on Top. You can change these anytime.
- Reset: This will let you remove content of your page. This is only necessary when your page gets stuck that you can not update anymore because of copying pasting directly from other websites or a Microsoft Word document that brings unwanted code into your page. Remember, resetting a page means deleting the contents. There will be a warning before deletion.
- Delete: This will let you delete your Photo Gallery completely including photos you uploaded. There will be a warning page before deletion.
- Preview/Admin Mode: This will let you preview your gallery before publishing it online (it will remove all admin buttons so that you can see what visitors will see). You can change it to Admin mode anytime.
- Update: This will let you add content (description of your map activity, instructions etc.) to your Google Map page.
- Add New Location: This will let you add name and address of a location which will automatically appear on your Google Map.You can add as many locations as you need with a description for each location. You can enter standard address, only a zip code or just the name of the location (White House, USA) as the location information. Google Map will identify the place and mark it on the map automatically.
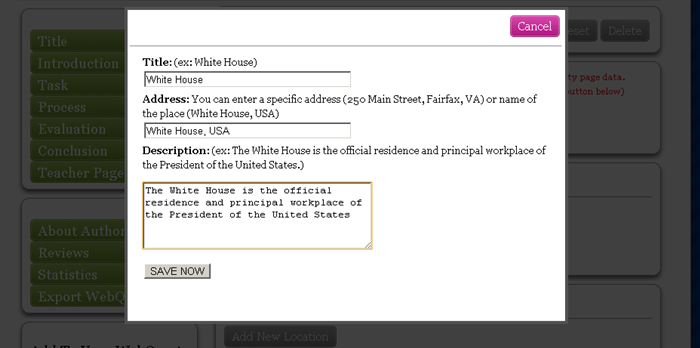

- Update/Delete: By clicking on Update/Delete buttons next to each location, you can update your selection of locations.
- You can add as many locations as you want or update each at anytime, even after you publish your WebQuest.
- Go Back to Map Activity Page: This will take you to your Google Map page (visitors will see).
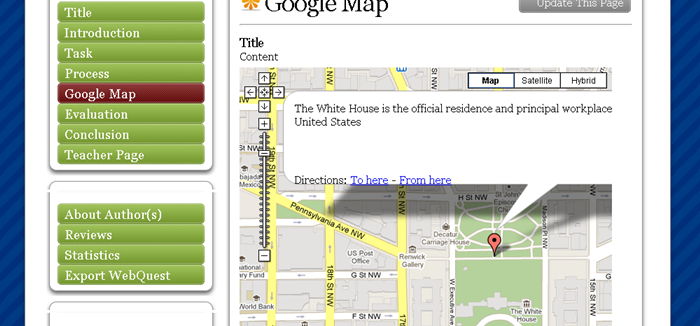
- Update This Page: This will let you go back to Update Map page where you will be able to configure your map locations and change content.
- How many Google Map can I add to my WebQuest?
One per WebQuest - How many locations can I add to my Google Map?
Unlimited - Can I add picture/photo or attach resources (files, videos) to my Google Map?
No.
1. Description In general, a quiz helps determine what students have learned. A well-designed quiz can give critical information about a student's understanding of the material. The Quiz module at ZUNAL is to help you create a quiz for your WebQuest so that you can assess students' previous knowledge (pre-test) or the impact on student learning (post-test).
- You can create a quiz, temporarily activate/de-activate your quiz, or completely delete your quiz at anytime.
- Once you have an active Quiz, your visitors/students can take the quiz online at anytime.
- Quiz module will automatically save all the responses you received. This way, you can analyze the quiz results, print them or delete responses individually as well. The results will be displayed at "See Quiz Results" page.
- The quiz can be taken anonymously or you can ask participants to enter their names or special code(s) before submitting for individual progress reports.
- Please remember, deleting a quiz or changing questions will delete all responses.
- Make sure that you are logged in
- Go to your WebQuest and find "Quiz" tab on the left menu and click on it
- Now hit on "Add Quiz".
- Your Quiz Page structure is now created. The page will automatically take you to your Quiz Page so that you can update your quiz, add questions etc.
Figure 1. Quiz Page Elements
- Update Quiz: This will let you update quiz title and quiz description. You can change it anytime even after you publish your quiz and receive responses (Changing questions is different - see below)
- Delete Quiz: This will let you delete the quiz completely including questions and responses. There will be a warning page before deletion. Please remember, deleting a quiz will delete all the responses you collected (if any).
- Add Question: This will let you add a question for your quiz.
- You can add as many questions as you need.
- Currently, only multiple choice questions can be added.
- Even though five options can be given, you can make it less (3 selections - a, b, c)
- Please do not skip options (bad practice: a, c, d, e leaving b blank).
- Question Point Value is to help you score quizzes and provide different values for each question. For example: You can set low values for easy questions while higher values for hard ones. ZUNAL will automatically calculate the values and overall scores for you.
- You can change your questions anytime before a person takes your quiz. If you change it after you have response(s), you can still change it, but the responses will be deleted.
Figure 2. Add a Question
- Quiz Results: This will let you view responses you received so far for your quiz. You can remove responses if you want (one by one or all at once). Quiz results are only available to WebQuest owner. It is not public.
- Hide/Show: This will let you hide/show your quiz page from visitors. This way, even though you have a quiz on your WebQuest, you can hide it from visitors when you publish it.
- Rename: This will let you rename your menu item regarding Quiz page. Short Menu Item refers to your menu located on the left bar, and Long Menu Item refers to Page Title on Top. You can change these anytime.
- Preview/Admin Mode: This will let you preview your Quiz page before publishing it online (it will remove all admin buttons so that you can see what visitors will see). You can change it to Admin mode anytime.
- Testing Your Quiz: You can test your quiz anytime. There are many options. 1 - Take the quiz at the quiz page directly, 2 - Take the quiz at Preview Mode, 3 - Take the quiz after publishing your WebQuest. (make sure to rem eve your responses collected during testing).
- Anonymous vs Name: Your quiz is publicly available as soon as you publish your WebQuest. Since anybody can take your quiz - in order to separate spam, random responses - you can ask your students or group provide a name or a special code to enter while taking the quiz.
- Can I create an open ended question for my quiz?
Not at this time. - How many questions can I add for my quiz?
Unlimited - How many quizzes can I create for my WebQuest?
One for per WebQuest - Can I add picture/photo to my quiz questions?
Not at this time. - Is there a limit on number of quiz takers?
No limit.
Control Panel
Overview
ZUNAL will not only let you create a professional looking webquest, but also change the look and feel aspect of it. Using the "Settings"
page, you will be able to change the language, template or menu button colors for each of your webquests. Clicking on the settings button will take you a page similar to this. Below you will see instructions on how to use this page to change your webquest template.
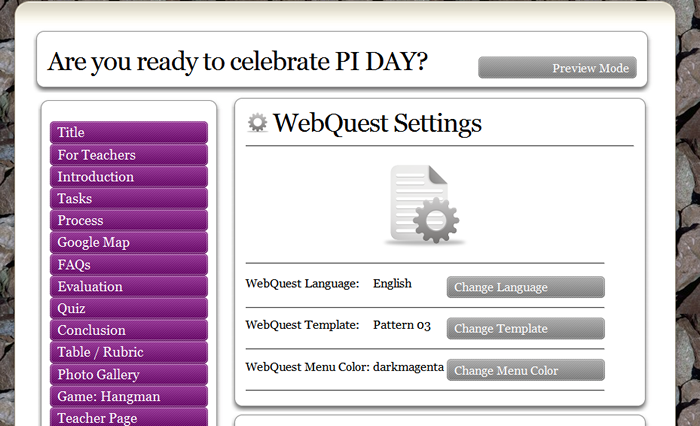
Figure 1. Screenshot of "Settings" page.
Change language settings
Using ZUNAL, you will be able to present your webquest in a language other than English. Currently, ZUNAL supports English, Turkce, Spanish, German, Portuguese, Francais, Catalan, Greek. However, please remember that only button labels will change to the new language. ZUNAL will not be able to convert your webquest content to another language. ZUNAL does not provide content translation since true translation of content to another language is simply impossible (some websites exist but unable to complete true translation google etc.). Using the settings page, click on "Change Language" and on the prompt window, select the language. ZUNAL will automatically convert all buttons to the language you chose (see below English vs. Turkish languages). You can change your webquest language anytime even after you publish your webquest.

Figure 2. Screenshot of WebQuest in English
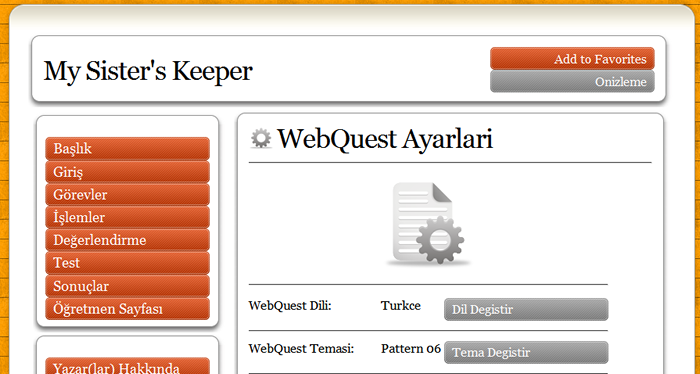
Figure 3. Screenshot of WebQuest in Turkish
Change webquest template
You can also change the template of your webquest which includes the changing of background with automatically matching link colors (light link colors for dark backgrounds). We have more than a hundred templates to choose. When you are on "Settings" page, click on "Webquest Template" and select the template you would like set for your webquest. You can change your template anytime even after you publish your webquest.
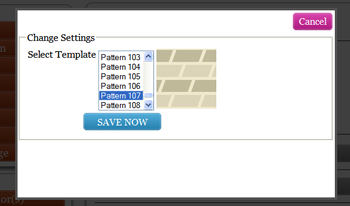
Figure 4. Screenshot of "Change Template" function on "Settings" page.
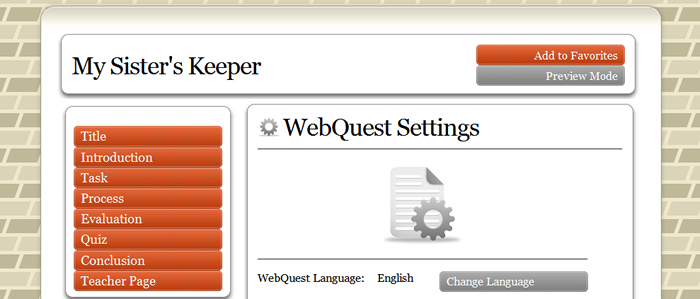
Figure 5. Screenshot of a webquest using a new template
Change menu color
Using the "Settings" page, you can change the color of your webquest menu items. We have all basic colors covered. When you are on "Settings" page, click on "Webquest Menu Color " and select the color you would like set for your webquest menu items. You can change your menu colors anytime even after you publish your webquest.
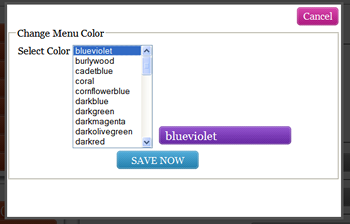
Figure 6. Screenshot of "Change Menu Color " function on "Settings" page.
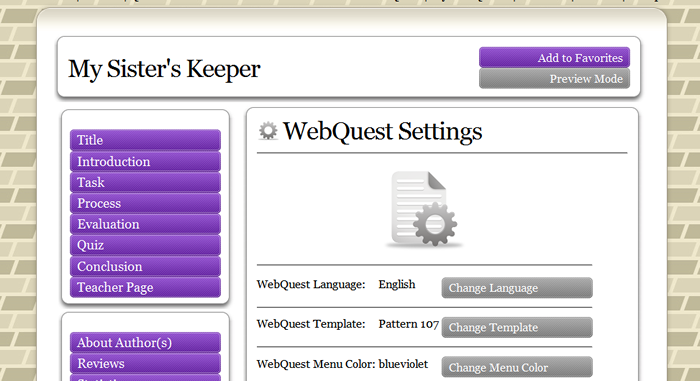
Figure 7. Screenshot of a webquest using a new menu color
- Can I change background color to something other than the ZUNAL templates?
Not at this time - Chan I change font size/style for menu?
Not at this time
Overview
Your webquest will not be available to public visitors before you actually publish it explicitly. In other words, you are the only person who can access to your webquest (and of course you have to be logged in) until you submit it for publication. That is why you will get to a page like below, if you ever try to access/view your webquest as a visitor (without being logged in) with the URL before you publish it.
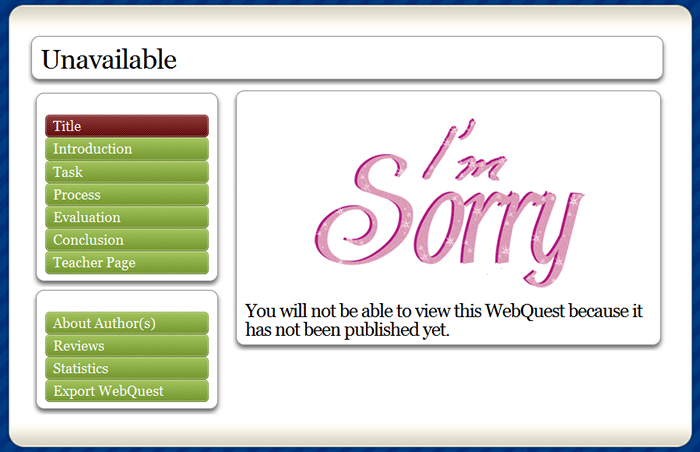
Figure 1. Screenshot of "Unpublished" webquest.
If you are receiving a page like this when viewing a webquest, it means the webquest is in the system but it is not published yet.
Options for publishing a webquest
When it comes to publishing your webquest, you have two options. Although it might sound complicated first, the process of publishing your webquest is very easy to understand and complete.
A couple of things to remember: Please understand that regardless of your choice of publishing option, when your webquest is published, it will be available to public visitors immediately. In other words, you will not need to wait for a confirmation email from ZUNAL. Also, publishing a webquest does not mean locking it forever. You can always come back and update your webquest even after you publish it without submitting it for a re-publication process. It also means that your webquest will still be accessible during the update after publishing it.
Now let's discuss publishing modes and how each publishing mode differ from each other. As you are already aware, ZUNAL currently have hundreds of new users registering daily which brings hundreds of new webquests created daily. This means that at anytime of the day, we have incomplete webquests that users are working on or planning to work on later, and also we have complete webquests that users finished and published. Therefore, as a start we have two types of webquests at ZUNAL: (1) incomplete webquests (not published) and (2) completed webquests (published). Like mentioned above, when a webquest is published, it is public (viewable) to visitors immediately. This will ensure that even you completed and published your webquest at 3:00 am in the morning, it will automatically become available to visitors via direct URL. You can simply email your webquest URL to your students, instructors or anybody so that they can reach it. We hope that you are following this far (differences between not published and published webquests).
Now, let's go further in the publication process (if not, please read above one more time.). As you can imagine, ZUNAL has a full WebQuest Matrix (database) that stores thousands of quality webquests for visitors created by its users. It also provides a Search Engine where visitors can search published quality webquests based on a keyword.
In order to provide good quality webquests for its visitors, ZUNAL tries to maintain this database clean and neat by storing only good quality webquests. Now, we can all assume that not all webquests published at ZUNAL are good quality webquests. As a matter of fact, you would not believe some of the projects that are published as webquests (ex: webquests created for spam purposes by advertisement companies.)
Now, this also means that ZUNAL needs to have a process of identifying unpublished webquests, published webquests, and quality (featured) webquests so that it gives users option to publish their projects immediately without keeping users on hold or waiting but at the same time it also promotes good quality webquests on its matrix database, search engine and ZUNAL main page.
Therefore, ZUNAL provides opportunity for its users to publish their webquests in "Featured" mode so that ZUNAL can review webquests published in "Featured" mode for consideration of promoting them in ZUNAL matrix, search engine and main page. Now we have two types of published webquests (in addition to unpublished ones). See differences among each type of webquests.
- Incomplete webquests (not published)
- Complete Published webquests (Standard: published and available via direct link but not promoted at ZUNAL matrix, search engine or front page)
- Complete Published and Promoted webquests (Featured: published and available via direct link AND promoted at ZUNAL matrix, search engine or front page)
| Description | Unpublished (Incomplete) |
Published (Standard) |
Published (Featured) |
| Available to owner via login anytime | Yes | Yes | Yes |
| Can be updated anytime | Yes | Yes | Yes |
| Will be stored as long as owner keeps it | Yes | Yes | Yes |
| Available to public/visitors via direct URL | No | Yes | Yes |
| Placed and promoted in ZUNAL Matrix after review | No | No | Yes |
| Placed and promoted in ZUNAL Search Engine after review | No | No | Yes |
| Placed and promoted in ZUNAL Main Page after review | No | No | Yes |
Whether it is in "Standard" or "Featured" mode, you can publish your webquest and/or follow up publication status on your "Publish" page located on each of your webquest. In order to access this page, you must be logged in and go to "Publish" page on your webquest menu. The look of the default "Publish" will be similar to the one below.

Figure 2. Screenshot of "Publish" page.
The first part shows your submission requests and second part represents current publication status of your webquest.
Publish in "Standard" mode
If you would like to publish your webquest in Standard Mode so that you can have your webquest publicly available immediately, click on "Publish" button located next to "WebQuest submitted for publication". ZUNAL will let you check if you are ready to publish your webquest by searching to see if you have completed all the pages and prompt you for publication.

Figure 3. Screenshot of a warning on "Publish" page.
Click on "Continue/Publish Anyway" button to make your webquest available to public visitors. ZUNAL will congratulate you for publishing your webquest and change its status. You will receive an updated page very similar to one below.
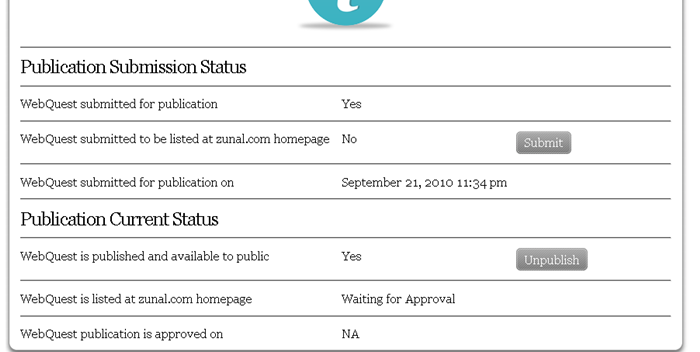
Figure 6. Screenshot of a submitted webquest in "Standard" mode.
If you look at your "Publish" page carefully now, you will see the changes. Change 1: Your webquest is submitted for publication is set to "Yes" and Change 2: WebQuest is published and available to public status is set to "Yes". This is basically telling us that our webquest is successfully published and available via direct URL. Direct URL can be found in the bottom of the page.
Publish in "Featured" mode
Once your webquest published in "Standard" mode, you can also submit it to be featured. There are many advantages having your webquest published as "Featured" including publicity, having your webquest listed at ZUNAL homepage, ZUNAl matrix and search engine. Remember, even though you will still be able to provide your visitors the link to your webquest, publishing it as "Featured" will help you get visitors directly from ZUNAL. You worked hard for your webquest, it is time to promote it. In order to submit your webquest in "Featured" mode, click on "Submit" button located next to "WebQuest submitted to be listed at zunal.com homepage". If you have all the pages completed in your webquest, it will automatically be submitted. (see below screen).
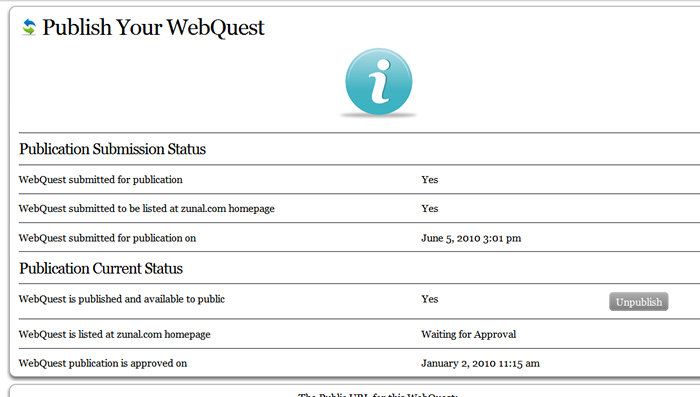
Figure 7. Screenshot of a submitted webquest in "Featured" mode.
If you have missing pages on your webquest, you will receive a message that tells you what pages are missing and ask you to complete those pages before publication. Again, these actions will not affect your "Standard" mode publication. Your webquest will be available and live during all these process.
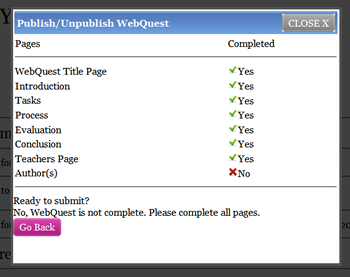
Figure 7. Screenshot of a warning on "Publish" page.
Now that your webquest is submitted for review to be listed at ZUNAL, you need not to worry except wait for the review to be completed. In 24 hours, we will visit your webquest and do a quick check to see if it is eligible to be published at ZUNAL matrix. If positive, your webquest will automatically be added on our Featured WebQuests list so that it will be available at ZUNAL homepage, search engine and ZUNAL webquest matrix. You will be able to check status on your "Publish" page. If negative, you should be able to receive the status and reasons automatically on "Publish" page. he page.
Unpublish a webquest
If you ever decide to unpublish your webquest so that it is not accessible to others, you can do this using "Publish" page automatically and anytime using "Unpublish" button. Please understand that unpublish does not mean deleting your webquest. You are just making your webquest from public to private.

Figure 8. Screenshot of a "Unpublish" function on "Publish" page.
- Can I still update my webquest after publishing it ?
Yes, anytime - Do I have to unpublish my webquest for changes?
Not - How come I cannot find my webquest on ZUNAL webquest search engine?
Because it is not published in Featured" mode - Can people still access my webquest if it is published in "Standard" mode?
Yes
Others
Overview
Group accounts are available only for "Group Account" holders. This is a special subscription where a person subscribes for a group account and distributes the group code for people to join. For example: An instructor of the course subscribes for group accounts so that s/he can share the group code with her/his class. A media specialist at a school gets a group account for her/his teachers, A school district gets a group subscription for its teachers etc. Only group leader needs to register for subscription, members will not need to subscribe anything but join to the group using the group code.
You can access your group page using "Group" menu item located on the right-top section of ZUNAL website. Remember, you must be logged in first. Depending on your latest status, your group page will display different information for different users. The default is that you have a ZUNAL account and you do not have a group yet. Below is the page you will receive.
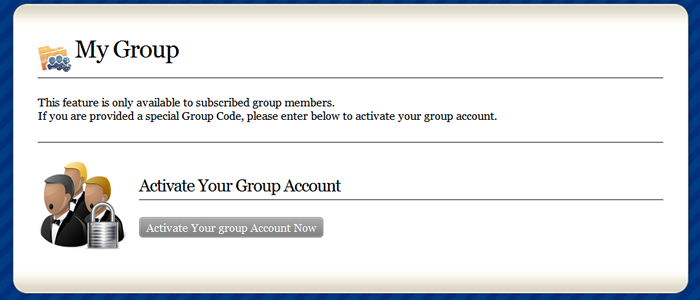
Figure 1. Screenshot of "Group" page with no group for the current account.
Joining a group
If you are provided a code so that you can upgrade your account and join to the group. please click on "Activate Your Group Account Now" button located on "Group" page. All you need to do now is to enter your group code. Once entered, ZUNAL will do the rest for you.

Figure 2. Screenshot of "Join Group" function on "Group" page.
Your account will be upgraded to pro account and your account will be added to your group. You will be able to access your group page where you will see group information, members and their webquests. For example: If you joined to a class group, you will see teacher info, students and their published webquests.
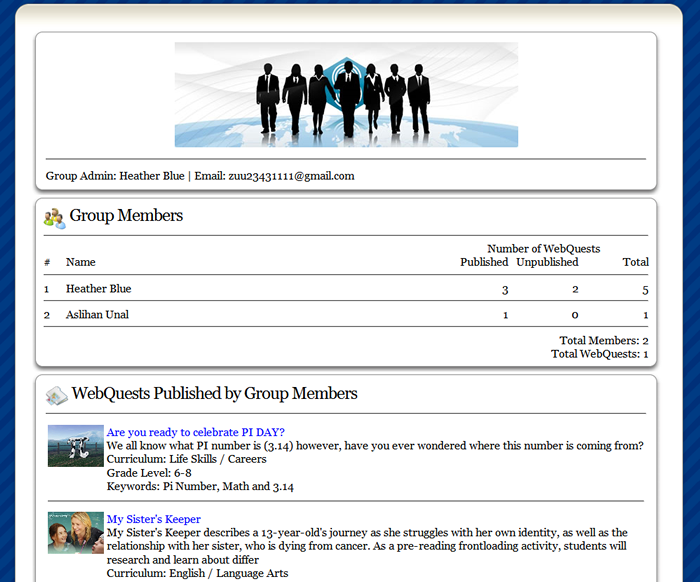
Figure 3. Screenshot of "Group" page for a "Group Member".
Managing a group
We have gone through instructions on how to view group page and what group members see when they join a group. Following, we will explore how to manage a group. If you are the person who subscribed for a group account, please do not feel overwhelmed. Your task WILL NOT be managing accounts, resetting passwords, helping errors etc. This is all done by ZUNAL. All you need to do is to provide your group key to your members so that they can join to your group and observe their work.
Once your subscription is active, you will be taken to your group page where your group key will be located. ONLY YOU CAN SEE YOUR GROUP KEY. below group code, you will be able to view your group members and their number of published/unpublished webquests. Next section will list all the webquests published by your members so that your group members can access to group webquests. See below screen for further information.
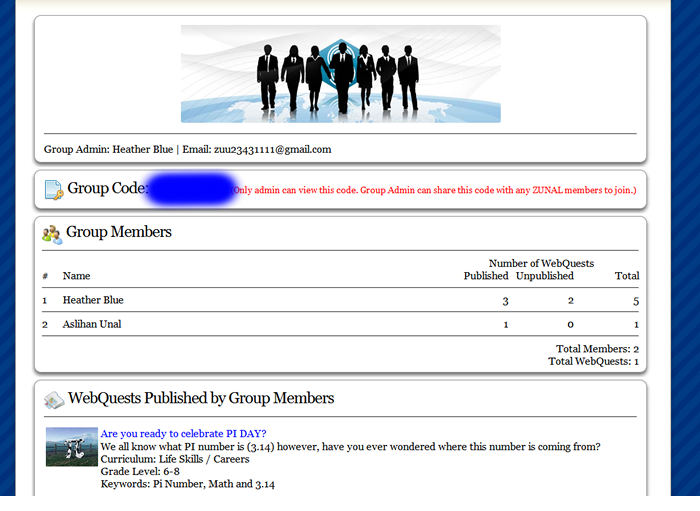
Figure 3. Screenshot of "Group" page for a "Group Admin ".
- How can I subscribe for a group ?
Please see group account subscription on Account page.
Overview
ZUNAL Sites is one of the latest an add-ons to ZUNAL WebQuest Maker. It helps educators create independent websites related to webquests. For example:
- An instructor can create a ZUNAL site for his/her class/students when teaching about webquests. ZUNAL sites can be interactive in a way that an instructor can use ZUNAL site for adding instructional pages, forums for discussion board, and webquest collections where class discusses certain webquests. See an example
- A workshop presenter can create a group website for insturction, discussion and collections.
- A person can create a portfolio Site where s/he lists webquests, accomplishments etc.
- and many more reasons...
- And best of all, ZUNAL sites allow private websites (only members/students can access) as well as public ones. It is very similar to course management systems where only instructor and students have access. In fact, you can even set different permissions for different parts of your site (some pages are private, some admin only, some public).
- Membership is automatically done (you do not have to deal with account permissions, login problems etc. We will take care of those.) with a code.
- You can even add more admins to control your website.

Figure. An example of ZUNAL Site
Create a Site
Login first and go to "My Sites" page where you will see list of websites you created and/or joined. To create a website, click on "Create a New Site" button.
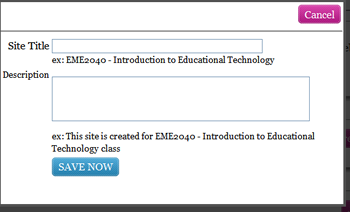
Figure 1. Screenshot of "Create a New Site" on My Sites section.
Type the Site title and description and click on Sa "Save Now". You can always change the title and description of your website. Once entered, you will automatically be taken to website you just created for adding content.
Create a Section
ZUNAL sites will let you organize your pages, content using sections. Sections can be designed based on how you would like your visitors to view your website. For example: You can organize your website based on topic, subject, or time such as Website 1: (Section1, Section2, Section3...), Website 2: (Week 1, Week2, Week3...), Website 3: (Day1, Day2, Day3...), Website 4: (TopicA, TopicB, TopicC...)
To create a section, click on "Add Section" button.

Figure 2. Screenshot of "Add Section" on My Sites section.
Once completed, please click on "Save Now". Your section will be created so that you can add your content into it. You can create unlimited numbers of sections for your website and update them anytime. You will be able to move your section orders up and down.
Create a Page
Once you created a section, you can add unlimited number of pages. The pages are so flexible that you can also attach unlimted files, images, youtube, teachertube videos, audio file etc for each page. To create a page, click on "Add Page " button.
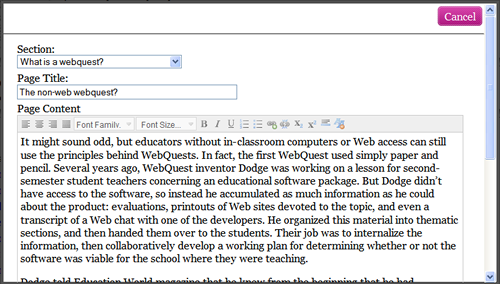
Figure 3. Screenshot of "Add Page " on My Sites section.
Once completed, please click on "Save Now". Your page will be created. You can create unlimited numbers of pages for your website and update them anytime. You will be able to move your page orders up and down and give permissions (public, member only, admin only).
Create a Collection
One of the best uses of ZUNAL sites is that it lets you create a collection of ZUNAL webquests for your class/workshop. These collections can be created by the admin or admin can allow members to submit webquests for the collection as well. You can add any webquest created and published at ZUNAL. There are numerous uses for collections.
- An instrcutor builds a collection to list webquests for online discussions.
- An instructor builds a collection to list his/her own webquests
- An instructor builds a collection and ask members/students submit webquests they found and ask them to discuss/evaluate.
- An instructor builds a collection and ask members/students submit their own webquests they created and ask them to discuss/evaluate.
- many more...
Once you create a colelction, you can add unlimited number of webquests published at ZUNAL. To create a collection, click on "Add Collection" button.
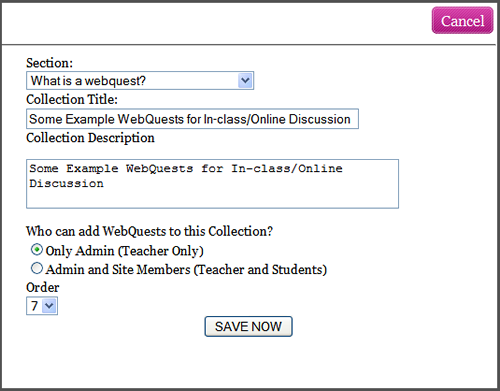
Figure 4. Screenshot of "Add Collection " on My Sites section.
Once completed, please click on "Save Now". Your collection will be created. You can now add unlimited numbers of webquests for in your collection and update them anytime. You will be able to move your collection orders up and down and give permissions (public, member only, admin only).
Create a Forum
Would you like to have a discussion forum on your website your your class? group? You can create as many as you want.
To add a discussion board, click on "Add Forum " button.
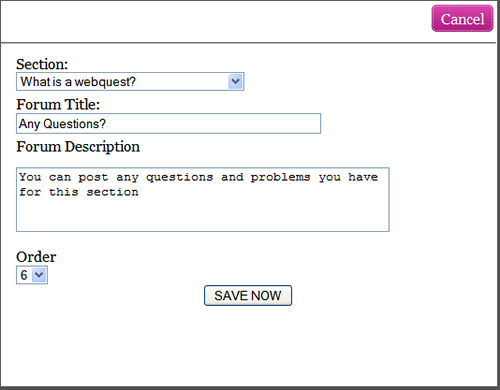
Figure 5. Screenshot of "Add Forum " on My Sites section.
Once completed, please click on "Save Now". Your forum will be created. You can add unlimited number of questions/responds on posted on your discussion board. You will be able to move your page orders up and down and give permissions (public, member only, admin only).
Members Page
As a Site admin, you will have full access to your Members page. You can invite, remove members and/or change their membership status. You will never have to deal with account issues, lost passwords etc. All you need to do is to provide the site code to your prospective members so that they can join to your site as member.
To view Members page, click on "Members" button.
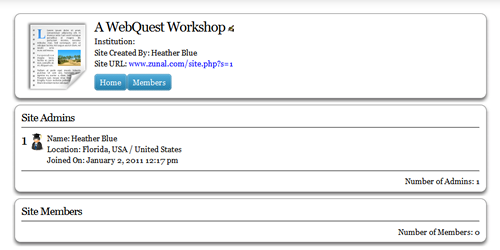
Figure 6. Screenshot of "Members" page on My Sites.
Permissions
Within the same site, you can set different permissions for each page/forum/collection. This way, you will be able to allow certain parts of your website to be accesabble to certain people. The defaul is "public". You can change the permissions using the permission buttons located nect to each of your page/forum/collection.
To change permissions, click on "Permission" button located next to your site element.
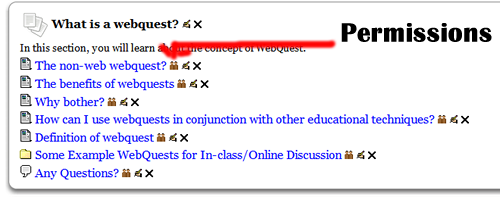
Figure 7. Screenshot of "Permissions" on My Sites.
Select your permmission level and Save it.
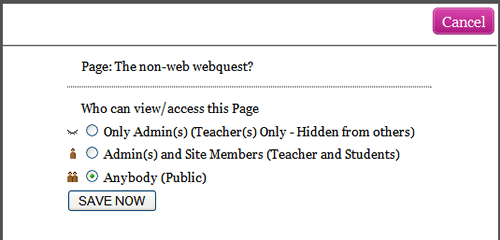
Figure 8. Screenshot of "Update Permissions" on My Sites.
- Can FREE account holders be a member to my site? Yes
- How many pages, sections, discussion forums, collections can I add to my site? Unlimited
- Can I use my site for my course that I am teaching? Yes, of course
- I have more questions? Please see our Questions page.